Windows10环境下Redis使用
安装
安装redis
这里我使用的是msi文件(Redis-x64-3.2.100.msi)安装。
安装redis桌面管理工具:Redis Desktop Manager
PS: 上面的下载地址不方便,重新找了最新版本下载地址Redis Desktop Manager,来自吾爱破解
设置密码
找到redis安装根目录的redis.windows.conf文件,设置密码为123456,修改如下:
1 | # requirepass foobared |
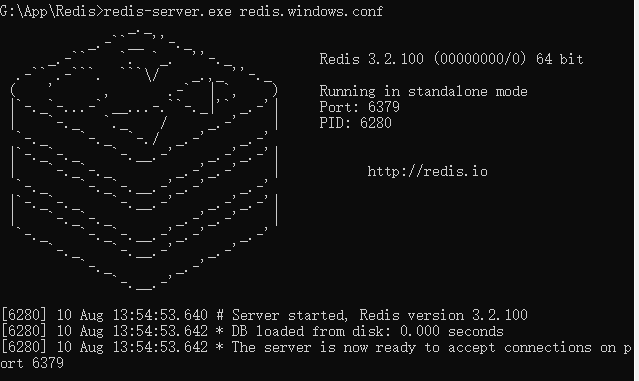
重启redis
1 | # redis安装根目录执行 |
启动redis成功界面如下:
设置redis后台运行
1 | # 首先关闭所有redis的cmd窗口 |
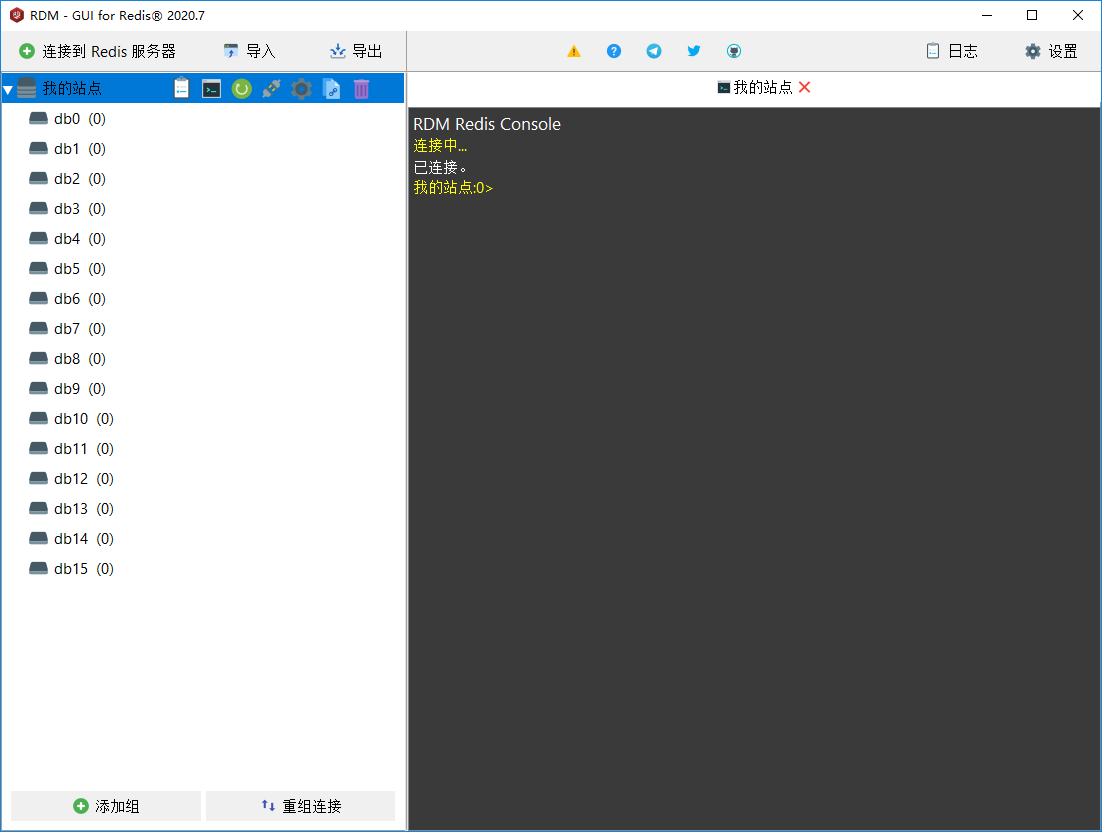
Redis Desktop Manager使用
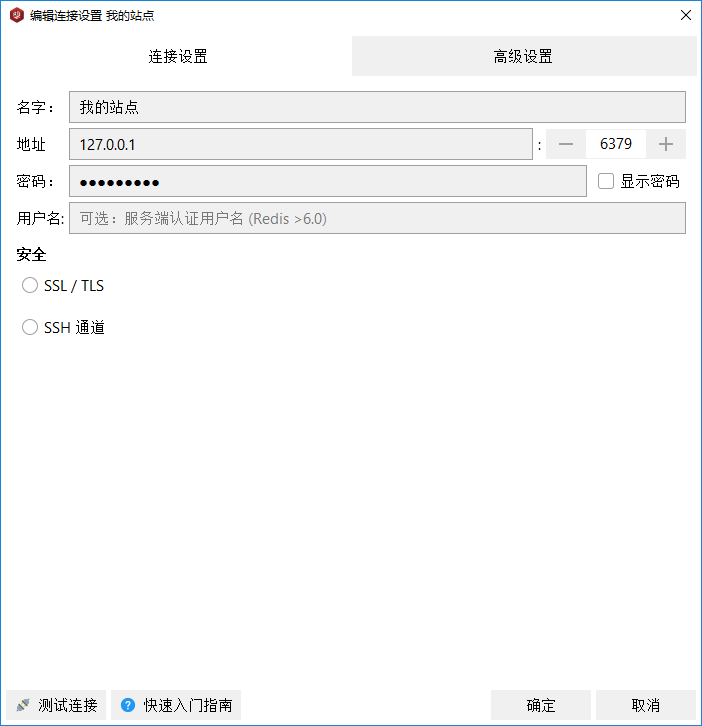
点击连接到Redis服务器,如下图填写设置后点击测试连接来判断是否成功连接redis
Centos7环境下Redis使用
安装
1 | # 下载指定版本安装包 |
安装说明:
- make install 指定安装目录的好处是程序位置固定,卸载只需要删除指定目录即可。坏处是需要设置环境变量或软连接指向安装的位置。
- 如果不指定安装目录安装的话,尽量记录下安装时的日志,即
make install & >|tee make_redis.log方便卸载时找到安装文件位置(如果程序不支持 make uninstall 的话只能手动清理)。- 相关说明见:https://blog.csdn.net/mydriverc2/article/details/9130371
卸载
1 | rm -rf /usr/local/redis |
配置
1 | # 增加默认配置文件 |
设置外网访问和密码
1
2
3
4
5
6
7
8
9
10
11
12
13
14
15
16
17
18
19
20
21
22
23
24
25
26
27
28
29# 注释掉它,以便让外网访问(或者设置成0.0.0.0)
# bind 127.0.0.1
# 设置密码(不设置也可以,但是加上安全些)
requirepass 123456
# 关闭保护模式(开启的话要配置 bind ip 和 密码)
protected-mode no
# 开启后台启动(Redis默认不是以守护进程的方式运行,yes表示启用守护进程,默认是no即不以守护进程方式运行)
daemonize yes
# 开启redis持久化,默认为no
appendonly yes
# 指定Redis监听端口,默认端口为6379(仅说明)
port 6379
# 指定redis数据库的日志级别,常用的日志级别有debug、verbose、notice、warning,不进行修改的情况下默认的是notice
loglevel notice
# 指定redis数据库多长时间内(s)有多少次(c)更新操作时就把缓存中的数据同步到本地库,比如:save 600 2,指的是10分钟内有2次更新操作,就同步到本地库
save 600 2
# 指定redis的最大内存。由于Redis 在启动时会把数据加载到内存中,当数据达到最大内存时,redis会自动把已经到期和即将到期的key值。所以可以根据需求调整自己的所需的最大内存
maxmemory 500mb
# 设置了maxmemory的选项,redis内存使用达到上限。可以通过设置LRU算法来删除部分key,释放空间。默认是按照过期时间的,如果set时候没有加上过期时间就会导致数据写满maxmemory
maxmemory-policy volatile-lru上面的配置都可以在 redis.conf 中搜索到,可搜索后修改。
设置开机自启
1
2
3
4
5
6
7
8
9
10
11
12
13
14
15
16
17
18
19
20
21
22
23
24
25
26
27
28
29
30
31
32
33
34
35
36# 拷贝redis源码中初始化文件redis_init_script
cp /tmp/redis-5.0.14/utils/redis_init_script /etc/init.d/redis
# 编辑该文件
vi /etc/init.d/redis
# 下面的意思是:redis服务必须在运行级2,3,4,5下被启动或关闭,启动的优先级是90,关闭的优先级是10。
# # chkconfig: 2345 10 90
# 下面是需要调整的3个配置,EXEC和CLIEXEC是安装时指定到/usr/local/redis,配置文件我们也在上面移动了因此需要指定
# EXEC=/usr/local/redis/bin/redis-server
# CLIEXEC=/usr/local/redis/bin/redis-cli
# CONF="/usr/local/redis/etc/redis.conf"
# 赋予可执行权限
chmod +x /etc/init.d/redis
# 启动测试(下面注释是启动成功日志)
/etc/init.d/redis start
# Starting Redis server...
# 3897:C 01 Feb 2024 15:22:52.375 # oO0OoO0OoO0Oo Redis is starting oO0OoO0OoO0Oo
# 3897:C 01 Feb 2024 15:22:52.375 # Redis version=5.0.14, bits=64, commit=00000000, modified=0, pid=3897, just started
# 设置开机启动
chkconfig --add /etc/init.d/redis # 注册服务,删除是:chkconfig --del redis
chkconfig redis on # 开启自启动服务
chkconfig --list # 查看自启动服务
# 可以通过 systemctl 控制redis服务
systemctl status redis # 查看状态
systemctl start redis # 启动
systemctl stop redis # 停止
systemctl restart redis # 重启
# 重启验证redis否自启动
reboot
# 连接(123456是密码)
redis-cli -a 123456遇到问题记录:
启动提示pid存在
1
2[root@iZ7xv53qbhixo6yuio5ah8Z ~]# /etc/init.d/redis start
/var/run/redis_6379.pid exists,process is already running or crashed解决方法:
rm -f /var/run/redis_6379.pid关闭redis服务
1
2
3
4
5# 方式一
pkill -9 redis
# 方式二
ps -ef | grep redis
kill -9 [上一步获取的redis进程的pid]启动成功日志
1
2
3
4
5
6
7
8
9
10
11
12
13
14
15
16
17
18
19# 如果不是 active 可以重启看看 => systemctl restart redis
[root@iZ7xv53qbhixo6yuio5ah8Z init.d]# systemctl status redis
● redis.service - LSB: Redis data structure server
Loaded: loaded (/etc/rc.d/init.d/redis; bad; vendor preset: disabled)
Active: active (running) since Thu 2024-02-01 16:08:42 CST; 2min 11s ago
Docs: man:systemd-sysv-generator(8)
Process: 6438 ExecStart=/etc/rc.d/init.d/redis start (code=exited, status=0/SUCCESS)
Tasks: 4
Memory: 1.2M
CGroup: /system.slice/redis.service
└─6440 /usr/local/redis/bin/redis-server *:6379
Feb 01 16:08:42 iZ7xv53qbhixo6yuio5ah8Z systemd[1]: Starting LSB: Redis data structure server...
Feb 01 16:08:42 iZ7xv53qbhixo6yuio5ah8Z redis[6438]: Starting Redis server...
Feb 01 16:08:42 iZ7xv53qbhixo6yuio5ah8Z redis[6438]: 6439:C 01 Feb 2024 16:08:42.884 # oO0OoO0OoO0Oo R...0Oo
Feb 01 16:08:42 iZ7xv53qbhixo6yuio5ah8Z redis[6438]: 6439:C 01 Feb 2024 16:08:42.884 # Redis version=5...ted
Feb 01 16:08:42 iZ7xv53qbhixo6yuio5ah8Z redis[6438]: 6439:C 01 Feb 2024 16:08:42.884 # Configuration loaded
Feb 01 16:08:42 iZ7xv53qbhixo6yuio5ah8Z systemd[1]: Started LSB: Redis data structure server.
Hint: Some lines were ellipsized, use -l to show in full/etc/init.d/redis 文件内容
1
2
3
4
5
6
7
8
9
10
11
12
13
14
15
16
17
18
19
20
21
22
23
24
25
26
27
28
29
30
31
32
33
34
35
36
37
38
39
40
41
42
43
44
45
46
47
48
49
50
51
# chkconfig: 2345 10 90
# description: Start and Stop redis
# Simple Redis init.d script conceived to work on Linux systems
# as it does use of the /proc filesystem.
### BEGIN INIT INFO
# Provides: redis_6379
# Default-Start: 2 3 4 5
# Default-Stop: 0 1 6
# Short-Description: Redis data structure server
# Description: Redis data structure server. See https://redis.io
### END INIT INFO
REDISPORT=6379
EXEC=/usr/local/redis/bin/redis-server
CLIEXEC=/usr/local/redis/bin/redis-cli
PIDFILE=/var/run/redis_${REDISPORT}.pid
CONF="/usr/local/redis/etc/redis.conf"
case "$1" in
start)
if [ -f $PIDFILE ]
then
echo "$PIDFILE exists, process is already running or crashed"
else
echo "Starting Redis server..."
$EXEC $CONF
fi
;;
stop)
if [ ! -f $PIDFILE ]
then
echo "$PIDFILE does not exist, process is not running"
else
PID=$(cat $PIDFILE)
echo "Stopping ..."
$CLIEXEC -p $REDISPORT shutdown
while [ -x /proc/${PID} ]
do
echo "Waiting for Redis to shutdown ..."
sleep 1
done
echo "Redis stopped"
fi
;;
*)
echo "Please use start or stop as first argument"
;;
esac
Docker 环境下Redis使用
https://juejin.cn/post/7081931407630532616
1 |
Express下使用redis
更多方法可以参考:https://www.cnblogs.com/wjlbk/p/12633315.html
yarn add redis@3.1.2
我这里列举我常用的方式:
将redisClient存储在node的全局对象global中(小型项目推荐)
1
2
3
4
5
6
7
8
9
10
11
12
13
14/** /bin/www
* Init redisClient.
*/
global.redisClient = require('redis').createClient({
host: '1270.0.1',
port: 6379,
password: '123456'
})
global.redisClient.on('error', function (err) {
console.log('redis 连接失败 ' + err)
})
// 其他地方就可以直接使用了
// redisClient.hmset("user:"+uid ,{uid:uid,name:"wuwanyu",age:"21"},next);将redis初始化方法,封装在index.js中,然后exports出去(中大型项目推荐)
1
2
3
4
5
6
7
8
9
10
11
12
13
14
15exports.init = function(){
var configs = require('../config.json');
var redis = require("redis"),
redisClient = redis.createClient(configs.redis);
redisClient.on("error", function (err) {
console.log("Error " + err);
});
return redisClient;
};
// 使用
// var redisClient = require("../database/index.js").init();
// redisClient.hgetall("user:"+uid,next);
注意,node的redis库不支持promise,如果处理可以参考官方示例:https://www.npmjs.com/package/redis
报错记录
1. not able to persist on disk
1 | MISCONF Redis is configured to save RDB snapshots, but it is currently not able to persist on disk. Commands that may modify the data set are disabled, because this instance is configured to report errors during writes if RDB snapshotting fails (stop-writes-on-bgsave-error option). Please check the Redis logs for details about the RDB error. |
原因:强制关闭Redis快照导致不能持久化。
解决方法:
1 | # 1. 将stop-writes-on-bgsave-error设置为no (重启失效) |
上面的解决方法是忽略错误,并不是解决错误,至于我们这里我是参考下面文章设置的:
https://blog.csdn.net/weixin_41866960/article/details/89608666
最近将一个项目部署到了腾讯云上,项目里用了redis做数据缓存。运行了三天都没有什么问题,但是到了第四天我进入网站某个页面时出现了bug,截图如下
org.springframework.data.redis.RedisConnectionFailureException: Cannot get Jedis connection; nested exception is redis.clients.jedis.exceptions.JedisConnectionException: Could not get a resource from the pool异常里面显示无法连接上redis ,第一时间我去查看服务器上redis的运行情况,发现redis仍然是在运行中的,然后当我想ping一下redis测试一下的时候,出现了以下错误
MISCONF Redis is configured to save RDB snapshots, but is currently not able to persist on disk意思是:Redis被配置为保存数据库快照,但它目前不能持久化到硬盘。用来修改集合数据的命令不能用。请查看Redis日志的详细错误信息。
去网上搜了一下这个问题,网上说原因是强制关闭Redis快照导致不能持久化。给出的解决方案是运行
config set stop-writes-on-bgsave-error no命令后,关闭配置项stop-writes-on-bgsave-error解决该问题。
2
127.0.0.1:6379> config set stop-writes-on-bgsave-error no完成以上操作后,重新刷新网页~真的可以了,牛逼!!然后我就去睡觉了。
然而又过了两天,网站又崩了~问题和上面一样,于是又去网上找解决方案,在这篇文章中找到了解决方案(https://www.cnblogs.com/qq78292959/p/3994349.html)
文章中说道将
config set stop-writes-on-bgsave-error设置为no仅仅是让redis忽略了这个异常,使得程序能够继续往下运行,但实际上数据还是会存储到硬盘失败。查看redis的日志,会发现一行警告:
“WARNING overcommit_memory is set to 0! Background save may fail under low memory condition. To fix this issue add 'vm.overcommit_memory = 1' to /etc/sysctl.conf and then reboot or run the command 'sysctl vm.overcommit_memory=1' for this to take effect.”(警告:过量使用内存设置为0!在低内存环境下,后台保存可能失败。为了修正这个问题,请在/etc/sysctl.conf添加一项vm.overcommit_memory = 1,然后重启(或者运行命令’sysctl vm.overcommit_memory=1’ )使其生效。)意思是说我系统内存不足,我看了下系统内存
free -m,明明还有挺多内存的啊。迷迷糊糊中我跟着修改
vm.overcommit_memory=1后问题果然解决了。有个问题,那明明系统内存还够,为什么redis会认为redis内存不足呢。上面链接中的文章也给出了问题原因分析而将
vm.overcommit_memory改为1有什么作用呢,网上看到一个博客是如下解释,我个人也比较同意0 — 默认设置。个人理解:当应用进程尝试申请内存时,内核会做一个检测。内核将检查是否有足够的可用内存供应用进程使用;如果有足够的可用内存,内存申请允许;否则,内存申请失败,并把错误返回给应用进程。举个例子,比如1G的机器,A进程已经使用了500M,当有另外进程尝试malloc 500M的内存时,内核就会进行check,发现超出剩余可用内存,就会提示失败。
1 — 对于内存的申请请求,内核不会做任何check,直到物理内存用完,触发OOM杀用户态进程。同样是上面的例子,1G的机器,A进程500M,B进程尝试malloc 500M,会成功,但是一旦kernel发现内存使用率接近1个G(内核有策略),就触发OOM,杀掉一些用户态的进程(有策略的杀)。
2 — 当 请求申请的内存 >= SWAP内存大小 + 物理内存 * N,则拒绝此次内存申请。解释下这个N:N是一个百分比,根据overcommit_ratio/100来确定,比如overcommit_ratio=50,那么N就是50%。
————————————————版权声明:本文为CSDN博主「反杀闰土的猹」的原创文章,遵循CC 4.0 BY-SA版权协议,转载请附上原文出处链接及本声明。
原文链接:https://blog.csdn.net/weixin_41866960/article/details/89608666

本文链接: http://www.ionluo.cn/blog/posts/1718214a.html
版权声明: 本作品采用 知识共享署名-非商业性使用-相同方式共享 4.0 国际许可协议 进行许可。转载请注明出处!
