简介
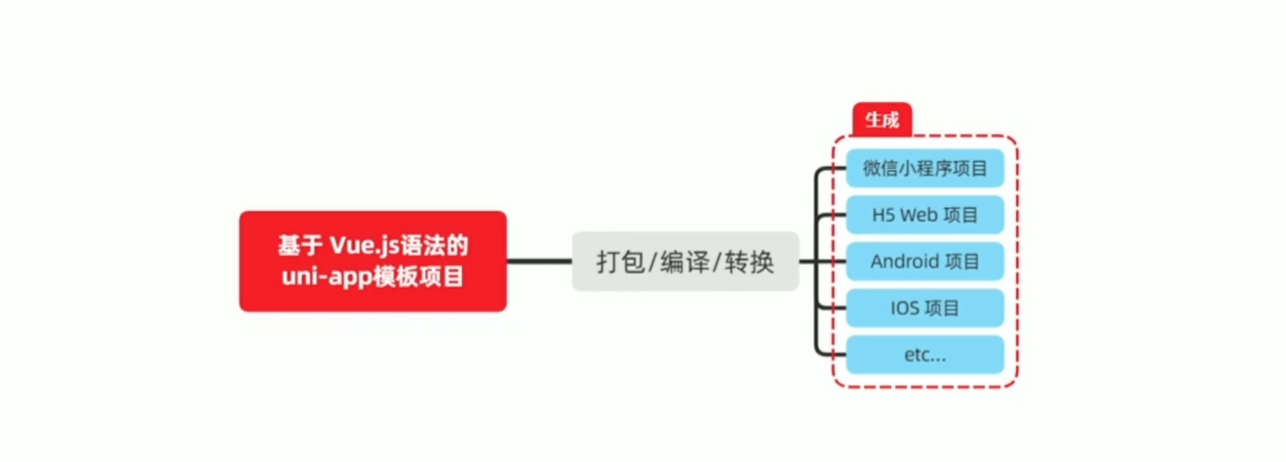
uni-app 是一个使用 Vue.js进行 开发所有前端应用的框架。开发者编写一套代码,即可发布到 iOS、Android、H5、以及各种小程序(微信/支付宝/百度/头条/QQ/钉钉/淘宝)、快应用等多个平台。
详细的 uni-app 官方文档,请翻阅 https://uniapp.dcloud.net.cn/
uni-app和vue的关系
- 使用vueJS开发
- 在发布到H5时,支持所有vue语法
- 发布到App和小程序时,实现部分Vue语法
uni-app和小程序的关系
- 组件标签靠近小程序规范
- 接口能力(JS API)靠近微信小程序开发
- 完整的小程序生命周期
学习重点
- 掌握uniapp技术本身,适配兼容安卓、IOS、html5、腾讯小程序4个平台
- 掌握uniapp的前后台完整开发流程
- 掌握组件化开发思路
知识点
uniapp开发环境搭建
uni-app基础api学习
unicloud云开发平台学习
unicloud基本使用方法
环境配置
高级方法使用
平台适配
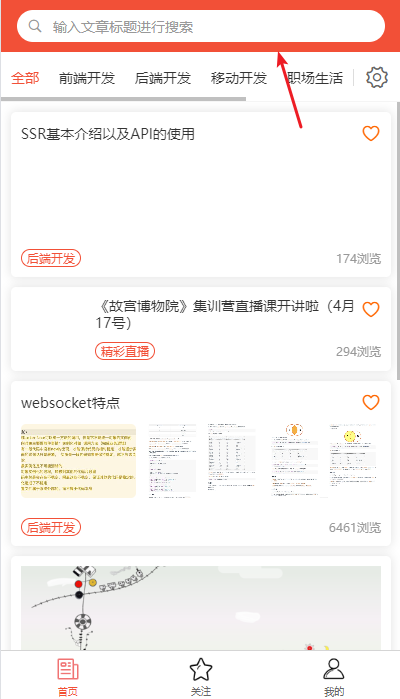
项目演示
- h5访问地址:https://www.ionluo.cn/demos/uni-blog/#/
- 安卓应用apk下载地址:https://mp-6cd2c609-4996-4633-86b2-d0c50be6d734.cdn.bspapp.com/cloudstorage/__UNI__85483AC_20240508231243.apk
- 微信小程序:暂未上线
微信小程序
- 开发文档:https://developers.weixin.qq.com/miniprogram/dev/framework/
- 微信公众平台:https://mp.weixin.qq.com/
- 开发工具下载:https://developers.weixin.qq.com/miniprogram/dev/devtools/download.html
开始
必选项处理
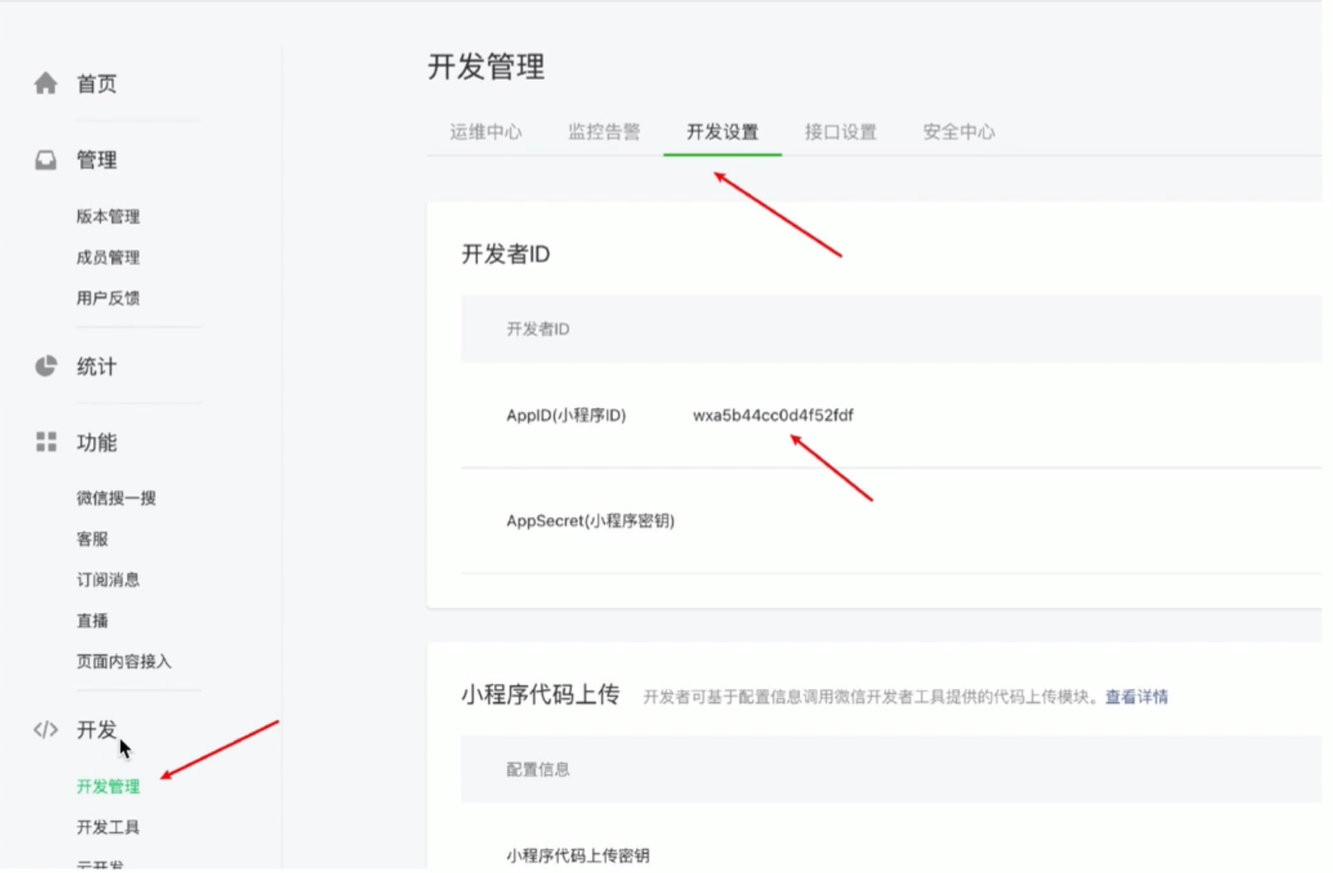
appID获取
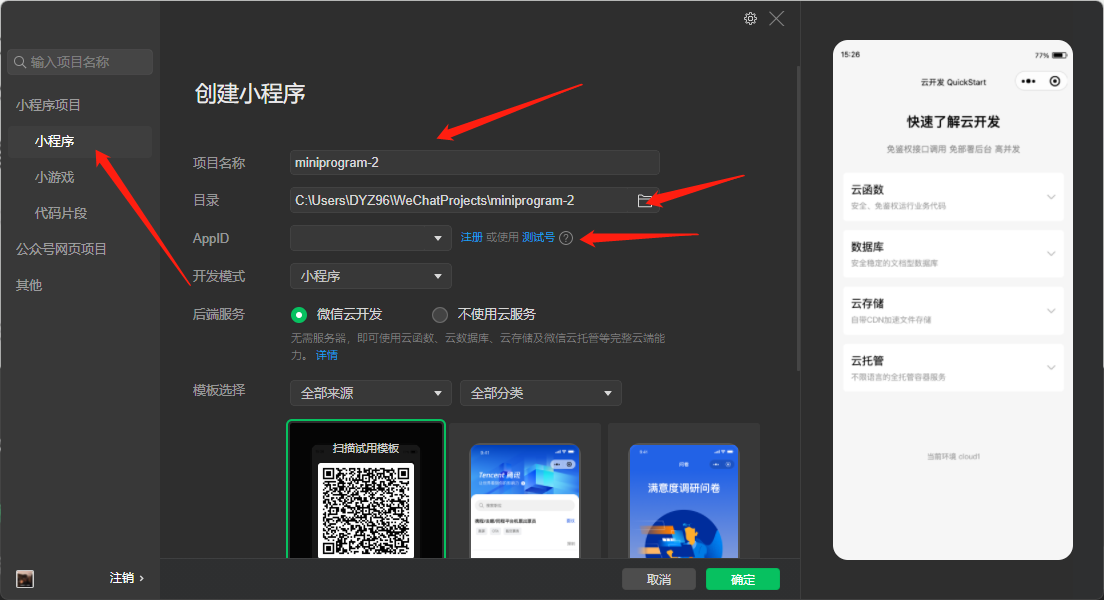
微信公众平台进行appID获取(不需要云环境和发布可以用测试号)
基本使用
详见文档,这里只是罗列了一些重点需要掌握的内容
也可以看我的另外一篇博客:https://ionluo.blog.csdn.net/article/details/84900138
全局配置:https://developers.weixin.qq.com/miniprogram/dev/reference/configuration/app.html
页面配置:https://developers.weixin.qq.com/miniprogram/dev/reference/configuration/page.html
全局生命周期函数 -> https://developers.weixin.qq.com/miniprogram/dev/reference/api/App.html#%E5%8F%82%E6%95%B0
1 | onLaunch: function () { |
页面生命周期函数 -> https://developers.weixin.qq.com/miniprogram/dev/framework/app-service/page-life-cycle.html
1 | onLoad: function(options) { |
组件生命周期 -> https://developers.weixin.qq.com/miniprogram/dev/framework/custom-component/lifetimes.html
1 | Component({ |
界面跳转 -> https://developers.weixin.qq.com/miniprogram/dev/framework/app-service/route.html
新界面打开
1
2调用 API wx.navigateTo({ url: '/pages/other/other' })
使用组件 <navigator open-type="navigateTo" url="/pages/other/other"/>页面重定向
1
2调用 API wx.redirectTo
使用组件 <navigator open-type="redirectTo"/>页面返回
1
2
3调用 API wx.navigateBack
使用组件 <navigator open-type="navigateBack">
用户按左上角返回按钮Tab切换
1
2
3调用 API wx.switchTab
使用组件 <navigator open-type="switchTab"/>
用户切换 Tab重启动
1
2调用 API wx.reLaunch
使用组件 <navigator open-type="reLaunch"/>
uniapp基础
开发规范
页面文件遵循Vue单文件组件(SFC)规范
兼容多端运行,使用flex布局进行开发
组件标签靠近小程序规范 =>https://uniapp.dcloud.io/component/README
接口能力(JS API)靠近微信小程序规范 => https://uniapp.dcloud.io/api/README
数据绑定事件处理同 Vue.js 规范
1
2
3
4
5
6
7
8
9
10
11
12
13
14
15
16
17
18
19<template>
<view @click="onClickFn">
点击事件绑定
</view>
</template>
<script>
export default {
methods: {
onClickFn() {
const res = uni.getStorageSync('storage_key');
console.log('click事件', res)
}
}
}
</script>
<style lang="scss" scoped>
</style>
开发工具
uni-app 官方推荐使用 HBuilderX 来开发 uni-app 类型的项目。由于其官方支持会在智能提示,最新特性支持会更好些,推荐。
下载地址:https://hx.dcloud.net.cn/Tutorial/install/windows
PS1: HBuilderX 3.4.6版本起,取消单独的App开发版安装包,统一为一个标准安装包。标准版也可以安装app相关插件。
PS2:采用 Visual Studio Code 也可以,但是需要一些插件支持,比如微信小程序需要用如下脚本进行构建后在微信开发者工具进行预览
2
3
4
5
6
7
8
9
10
11
12
13
14
15
16
const automator = require('miniprogram-automator')
const dir = process.argv.slice(2)[0] === 'dev' ? 'dev' : 'build'
const projectPath = path.resolve(__dirname, `./dist/${dir}/mp-weixin`)
const options = {
cliPath: 'D:/Program Files (x86)/Tencent/微信web开发者工具/cli.bat', // 工具 cli 文件路径
projectPath // 项目路径
}
console.log('正在启动微信开发者工具,尝试打开项目:' + projectPath)
automator.launch(options).then(miniProgram => {
miniProgram.disconnect();
}).catch(function (e) {
console.error(e)
})Visual Studio Code 项目的创建:https://uniapp.dcloud.net.cn/quickstart-cli.html
基本目录结构
1 | 项目名称 |
运行和调试
https://uniapp.dcloud.net.cn/tutorial/run-and-debug.html
微信小程序运行
- 在
manifest.json文件中 填写自己的微信小程序的 AppID - 在 HBuilderX 中,点击菜单栏中的
运行-运行到小程序模拟器-运行设置中,填写微信开发者工具的安装路径 - 在微信开发者工具中,通过
设置 -> 安全设置面板,开启微信开发者工具的服务端口 - 在 HBuilderX 中,点击菜单栏中的
运行 -> 运行到小程序模拟器 -> 微信开发者工具,将当前 uni-app 项目编译之后,自动运行到微信开发者工具中,从而方便查看项目效果与调试
app真机运行
确保你的手机与电脑是在同一个局域网下面
- 手机开启开发者模式
- 选择数据管理(USB连接手机)
- hbuildeX选择真机运行(需要检测到设备)
- 等待基座安装
- 安装完成手机运行项目
IOS模拟器运行
- Xcode下载
- 定义版本进行模拟器运行
不是mac设备就没有办法了,Xcode在appstore下载
组件
文档地址:https://uniapp.dcloud.net.cn/component/
组件就相当于UI框架,了解即可,需要的时候直接文档查找用法。有时候UI框架内组件满足不了项目需要,可以从插件市场进行查找
内置组件
演示地址:https://hellouniapp.dcloud.net.cn/pages/component/
演示地址内只包含部分内置组件的演示
扩展组件
演示地址:https://hellouniapp.dcloud.net.cn/pages/extUI/badge/badge
插件市场:https://ext.dcloud.net.cn/search?q=uni-icons
组件公共属性集合: id, ref, class, style, hidden, data-*, @*。除了上述公共属性,还有一类特殊属性以v-开头,称之为vue指令,如v-if、v-else、v-for、v-model
自定义组件
- componets文件夹下定义组件
- 页面使用组件(无需导入,直接使用即可)
- 其他操作(组件传值,事件绑定同vue)
如果只需兼容有限平台也可以使用小程序组件,否则还是推荐如上使用vue组件(注意只需定义组件后就可以直接使用了,这点和vue有些不同)
基础API
参考地址:https://uniapp.dcloud.net.cn/api/README
下面罗列部分最重要(最常用)的一些API。
网络请求
- uni.request 发起网络请求
为了解决uni.request网络请求API相对简单的问题(如不支持拦截器),可使用 @escook/request-miniprogram 进行网路请求的处理
注意:
- 在小程序中,无法使用fetch及axios进行网络请求发送
- @escook/request-miniprogram 支持uniapp
- 请求地址需要加白(小程序后台合法域名配置)
上传、下载
- uni.unloadFile 上传文件 => https://uniapp.dcloud.net.cn/api/request/network-file
- uni.downloadFile 下载文件
图片处理
- uni.chooseImage 从相册选择图片,或者拍照 =>https://uniapp.dcloud.net.cn/api/media/image?id=chooseimage
- uni.previewImage 预览图片
- uni.getImageInfo 获取图片信息
数据缓存 => https://uniapp.dcloud.net.cn/api/storage/storage?id=setstorage
- uni.getStorage 异步获取本地数据缓存
- uni.getStorageSync 同步获取本地数据缓存
- uni.setStorage 异步设置本地数据缓存
- uni.setStorageSync 同步设置本地数据缓存
- uni.removeStorage 异步删除本地数据缓存
- uni.reoveStorageSync 同步删除本地数据缓存
交互反馈 => https://uniapp.dcloud.net.cn/api/ui/prompt?id=showtoast
- uni.showToast 显示提示框
- uni.showLoading 显示加载提示框
- uni.hideToast 隐藏提示框
- uni.hideLoading 隐藏加载提示框
- uni.showModal 显示模态框
- uni.showActionSheet 显示菜单列表
路由
uni.navigateTo 保留当前页面,跳转到应用内某个界面,使用uni.navigateBack 返回原页面
uni.redirectTo 关闭当前界面,跳转到应用内的某个界面
uni.reLaunch 关闭所有界面,打开应用内的某个界面
uni.switchTab 跳转到tab Bar页面
页面布局
页面容器css属性,全局添加样式(注意不能加 scoped)
1 | page:{ |
尺寸单位
可使用单位:px rpx,upx, rem vh vw
推荐使用 rpx,详见:https://uniapp.dcloud.net.cn/tutorial/syntax-css.html#%E5%B0%BA%E5%AF%B8%E5%8D%95%E4%BD%8D
rpx 是相对于基准宽度的单位,可以根据屏幕宽度进行自适应。uni-app 规定屏幕基准宽度 750rpx。
开发者可以通过设计稿基准宽度计算页面元素 rpx 值,设计稿 1px 与框架样式 1rpx 转换公式如下:
1 | 设计稿 1px / 设计稿基准宽度 = 框架样式 1rpx / 750rpx |
换言之,页面元素宽度在 uni-app 中的宽度计算公式:
1 | 750 * 元素在设计稿中的宽度 / 设计稿基准宽度 |
外部样式文件引入
同vue使用相同
生命周期
下面仅是罗列了部分重要的钩子,完整的见所给的链接
应用生命周期: https://uniapp.dcloud.net.cn/collocation/App.html#applifecycle
onLaunch 初始化完成时触发(全局只触发一次)
onShow uni-app启动,或从后台进入前台显示
onHide 当uni-app 应用从前台进入后台
只能在App.vue里面进行监听,在其他界面监听无效
页面生命周期: https://uniapp.dcloud.net.cn/tutorial/page.html#lifecycle
- onLoad 监听页面加载(可获取上个界面传递的参数)
- onShow 监听页面显示,每次出现在屏幕上都进行触发
- onReady 监听页面初次渲染完成
- onHide 监听页面隐藏
- onUnload 监听页面卸载
- onReachBottom 页面滚动到底部事件
组件生命周期: https://uniapp.dcloud.net.cn/tutorial/page.html#componentlifecycle
- beofreCreate
- created
- boforeMount
- mounted
- boforeDestroy
- destroyed
条件编译
条件编译是用特殊的注释作为标记,在编译时根据这些特殊的注释,将注释里面的代码编译到不同平台。
使用方法
以 #ifdef 或 #ifndef 加 %PLATFORM% 开头,以 #endif 结尾。
#ifdef:if defined 仅在某平台存在#ifndef:if not defined 除了某平台均存在%PLATFORM%:平台名称
| 条件编译写法 | 说明 |
|---|---|
| #ifdef APP-PLUS 需条件编译的代码 #endif | 仅出现在 App 平台下的代码 |
| #ifndef H5 需条件编译的代码 #endif | 除了 H5 平台,其它平台均存在的代码(注意if后面有个n) |
| #ifdef H5 || MP-WEIXIN 需条件编译的代码 #endif | 在 H5 平台或微信小程序平台存在的代码(这里只有||,不可能出现&&,因为没有交集) |
%PLATFORM% 取值见文档,常用的有 APP-PLUS、H5、MP-WEIXIN
条件编译是利用注释实现的,在不同语法里注释写法不一样,js使用
// 注释、css 使用/* 注释 */、vue/nvue 模板里使用<!-- 注释 -->;
目录的条件编译:https://uniapp.dcloud.net.cn/tutorial/platform.html#static
示例
1 | <template> |
注意:
Android 和 iOS 平台不支持通过条件编译来区分,如果需要区分 Android、iOS 平台,请通过调用 uni.getSystemInfo 来获取平台信息。支持ifios、ifAndroid代码块,可方便编写判断。(详见:https://uniapp.dcloud.net.cn/tutorial/platform.html#uts)
unicloud
uniCloud 是 DCloud 联合阿里云、腾讯云,为开发者提供的基于 serverless 模式和 js 编程的实现后端服务的云开发平台。不需要服务器的购买配置即可快速创建一个完整的后端服务。
和微信小程序云开发语法上几乎是一样:https://developers.weixin.qq.com/miniprogram/dev/wxcloud/basis/getting-started.html
unicloud优点
- 用JavaScript开发前后台整体业务
- 非h5项目免域名使用服务器
- 敏捷性业务处理,不需要前后端分离开发
unicloud开发流程
项目 -> 云环境 -> 编写代码 -> 云函数 -> serverless -> 调用
构成
1 | ; |
**云数据库**(和MongoDB操作一样)
1 | ; |
云存储
参考文档:https://doc.dcloud.net.cn/uniCloud/storage/
云函数调用
1 | // promise方式 |
云函数实现云数据库的增删改查
详见:https://doc.dcloud.net.cn/uniCloud/cf-database.html
1 | ; |
- 上面为了演示把所有的代码合并到一个云函数中,实际编码的时候尽量不要如此操作,过多的await影响性能
- 云函数更改后都需要部署后运行,可以本地运行会快一些,但是无论线上运行还是本地运行,都是连接的云数据库
云存储操作
用 uni.chooseImage 方法进行图片选择获取
参考地址:https://uniapp.dcloud.io/api/media/image?id=chooseimage
1
2
3
4
5
6uni.chooseImage({
count: 1,
success(res) {
console.log(JSON.stringify(res.tempFilePaths))
}
})使用 uniCloud.uploadFile 进行文件上传
参考文档:https://uniapp.dcloud.io/uniCloud/storage?id=clouduploadfile
1
2
3
4
5
6
7
8
9
10
11
12
13
14
15
16uni.chooseImage({
count: 1,
async success(res) {
const result = await uniCloud.uploadFile({
filePath:res.tempFilePaths[0],
cloudPath:'a.jpg',
success(res) {
console.log(res)
},
fail(err) {
console.log(err)
}
});
console.log('result', result)
}
})使用 uniCloud.deleteFile 进行图片删除
参考文档:https://uniapp.dcloud.io/uniCloud/storage?id=clouddeletefile
阿里云函数删除不能在客户端进行删除操作,下列代码在云函数中进行使用
1
2
3
4let result = await uniCloud.deleteFile({
fileList:['https://vkceyugu.cdn.bspapp.com/VKCEYUGU-6ce25980-c28e-4e78-bdef-a96eb40ad98b/06a1cb3a-84b7-47a0-b554-8aff299cb255.jpg'],
});
console.log(result)
项目搭建
操作过程中可能存在要登录和安装插件,根据提示操作即可。
新建项目: 文件 - 新建 - 项目
项目名称是project,但是后面考虑到本地很多这个名字就改成了 uni-blog。下面图片第一个箭头位置名称要改下。
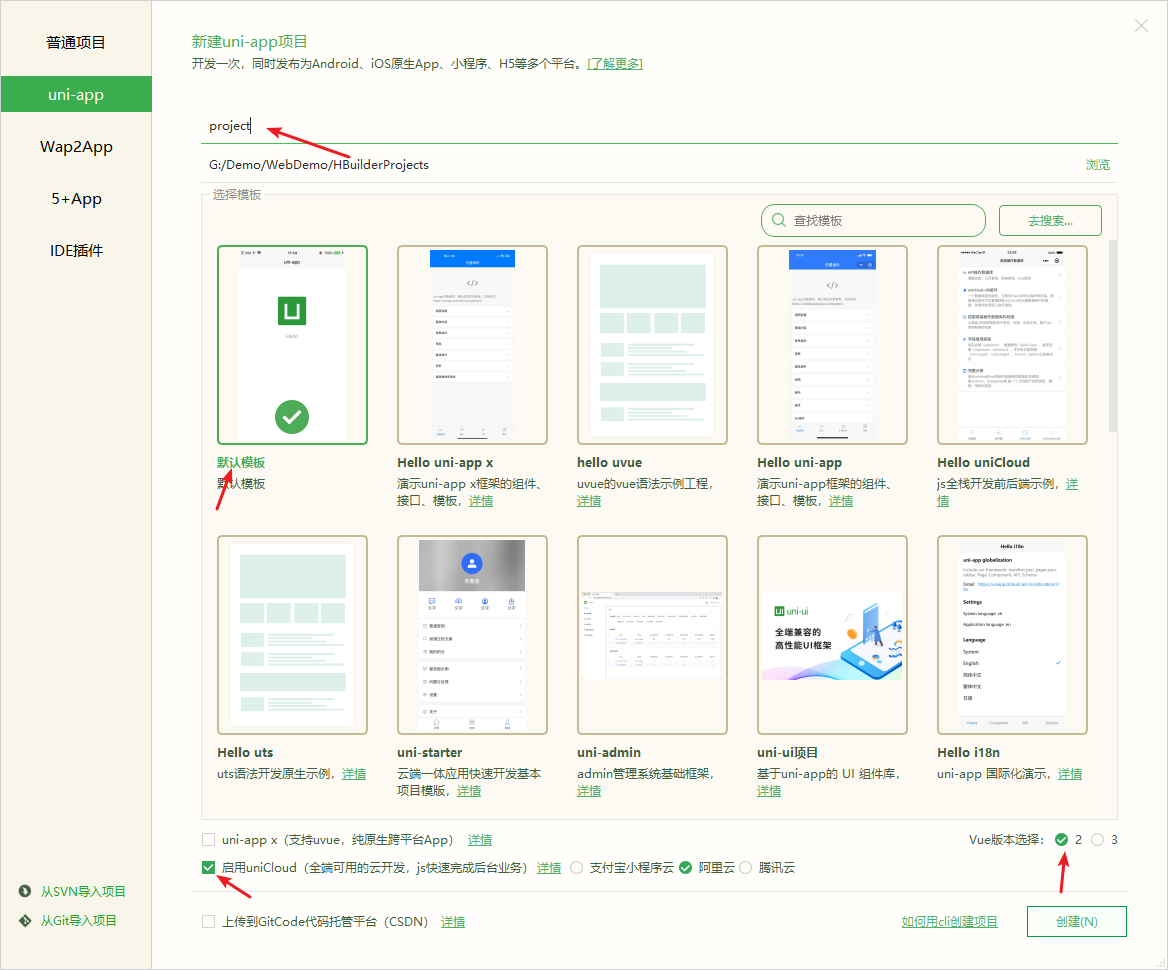
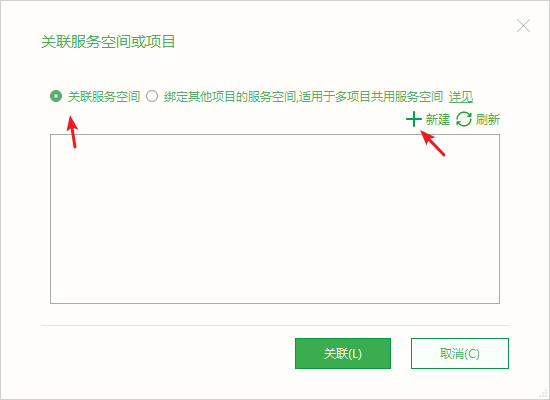
关联云服务空间:project - uniCloud - 鼠标右键 - 关联云服务空间或项目
可能提示缺少 appid,登录 https://dev.dcloud.net.cn/pages/app/list 常见一个应用 appid 填入 mainfest.json 即可(记事本打开该文件填入)
创建云服务空间
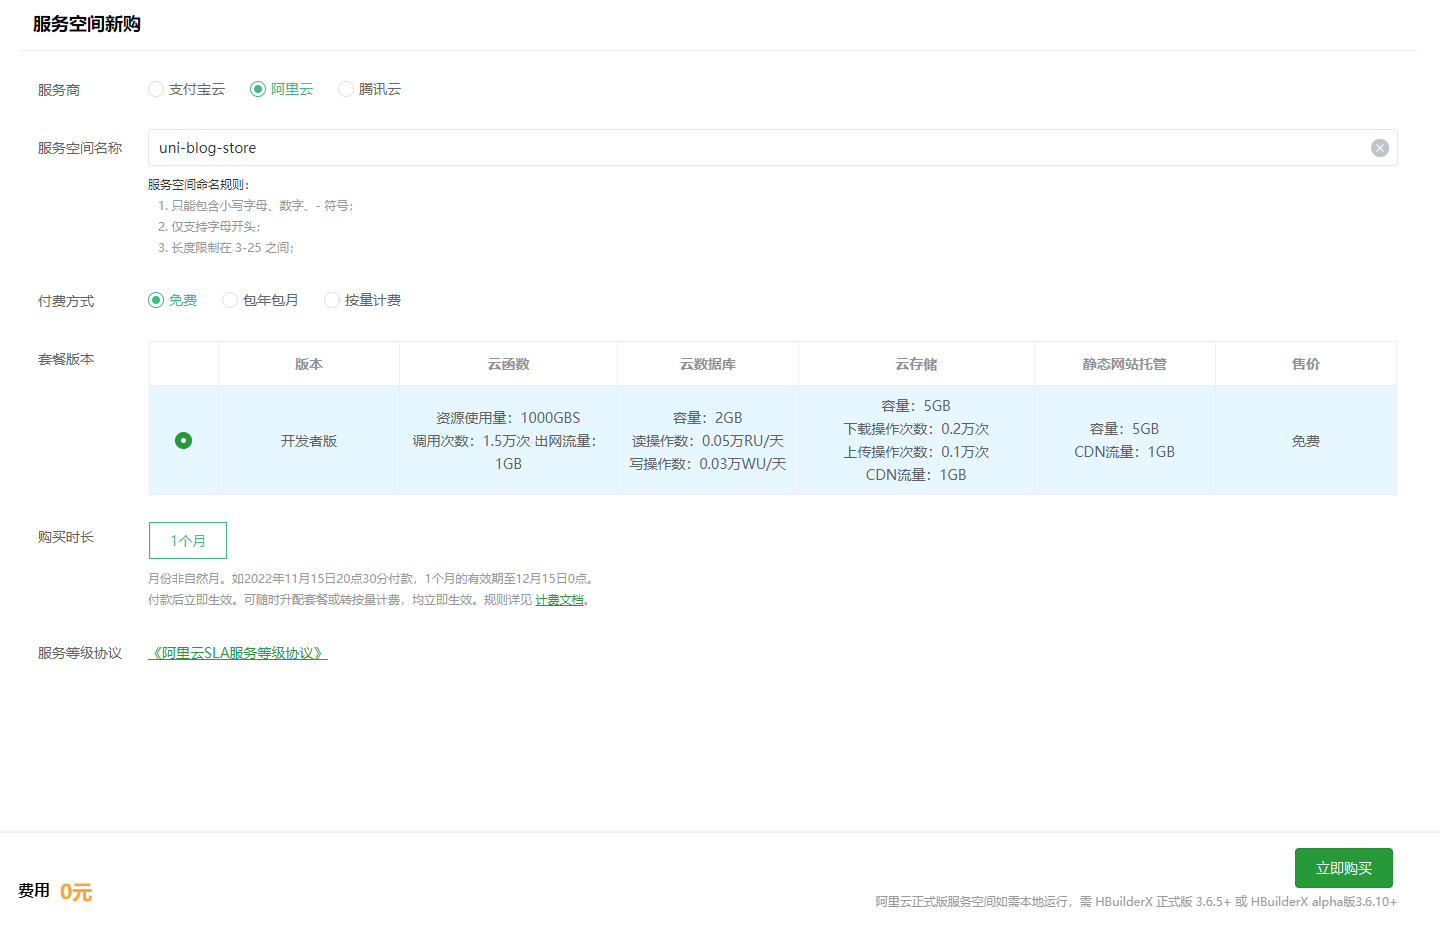
到期后需要续期,见:https://doc.dcloud.net.cn/uniCloud/price.html
等待控制台显示初始化完成后返回 HBuilderX,刷新找到刚刚创建的服务空间,点击关联即可
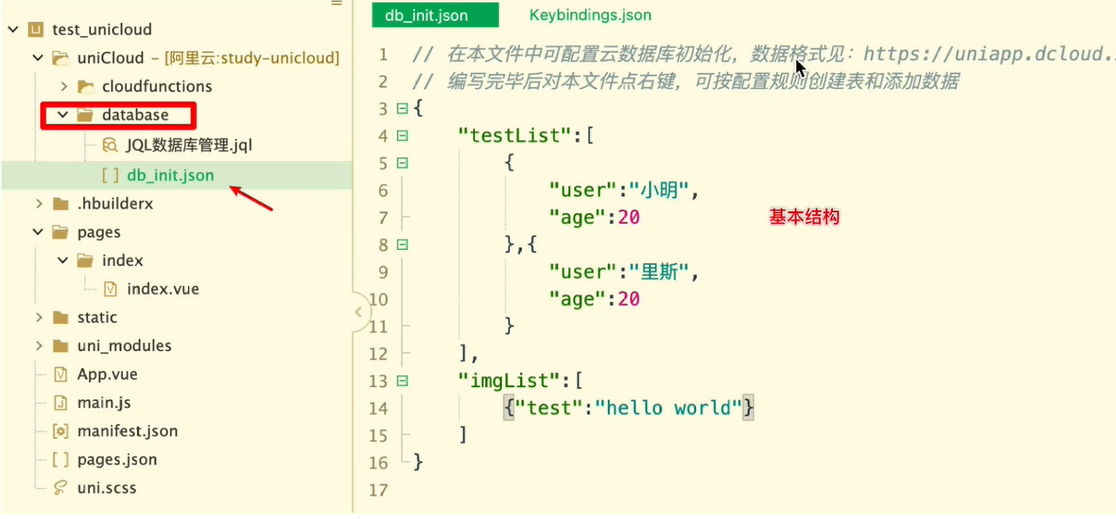
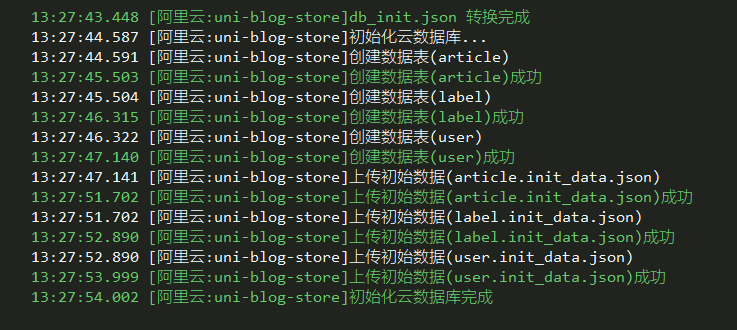
初始化数据库
参考文档:https://uniapp.dcloud.io/uniCloud/hellodb?id=db-init
uniCloud目录找到database目录 添加 db_init.json 文件(下面是示例图片,testList和imgList相当于一个表)。具体文件内容见项目代码,太多了就不贴出来了。添加该文件后右键该文件点击“初始化云数据库”。
项目注意事项
uni.scss文件定义公共变量及混编方法
也就是这里是全局的,无需再引入
page.json文件-tabBar创建
vue单文件组件中,其他组件不需要使用 import 进行导入
项目难点
顶部导航栏高度动态计算
顶部导航栏需要自定义先在 page.json 里面设置 navigationStyle
1 | { |
设置之后通过 fixed 样式把导航栏固定到顶部,由于在不同平台(如微信小程序)会有默认导航,因此该导航栏 padding-top 的距离(statusHeight)需要获取后计算
1 | // 获取手机系统信息 |
上面获取到的单位都是 px,要转成rpx
请求方法封装
定义公共的http请求方法
1
2
3
4
5
6
7
8
9
10
11
12
13
14
15
16
17
18
19
20
21
22
23
24
25
26// project/ajax/http.js
export default ({ name, data = {}, options = {} }) => {
/* 导出promise对象 */
return new Promise((resolve, reject) => {
uni.showLoading({
title: "加载中"
})
uniCloud.callFunction({
name,
data,
success ({ result }) {
if (result.code === 0) {
resolve(result.data)
} else {
uni.showToast({ icon: "none", title: result.msg })
}
},
fail (err) {
reject(err)
},
complete (res) {
uni.hideLoading()
}
})
})
}创建接口文件进行公共方法的调用
1
2
3
4
5
6
7
8// project/ajax/api/interface/common_interface.js
import ajax from '../../http.js'
// 获取当前安卓端版本
export const get_current_version = data => ajax({
name: 'get_current_version',
data
})方法挂载到Vue原型上,供每个界面进行使用
使用webpacck的require.context方法对所有的请求函数收集
1
2
3
4
5
6
7
8
9
10// project/ajax/api/index.js
const requireApi = require.context('.' /* API目录的相对路径 */, true /* 是否查询子目录 */, /.js$/ /* 需要查询的文件的后缀名 */);
let module = {};
requireApi.keys().forEach((key, index) => {
if (key === './index.js') return
Object.assign(module, requireApi(key))
})
export default modulemain.js进行方法挂载
1
2
3// project/main.js
import module from './ajax/api/index.js'
Vue.prototype.$http = module;require.context是什么?
一个webpack的api,通过执行require.context函数获取一个特定的上下文,主要用来实现自动化导入模块,在前端工程中,如果遇到从一个文件夹引入很多模块的情况,可以使用这个api,它会遍历文件夹中的指定文件,然后自动导入,使得不需要每次显式的调用import导入模块
页面/组件内部进行方法的调用
1
2
3
4async get_current_version() {
const res = await this.$http.get_current_version()
console.log(res)
}
SCSS样式封装
1、flex布局的混编方法
1 | @mixin flex($level_style:space-between, $vertical_style:row, $isWrapper:nowrap) { |
2、单行省略
1 | @mixin ellipsis { |
3、多行省略
1 | @mixin multi-ellipsis($rows: 2) { |
line-clamp尚未标准化,但是除了IE浏览器大多数都支持,如果需要全设备兼容可以借助JS实现 => https://github.com/josephschmitt/Clamp.js,或者简单兼容下通过过滤器截取指定字符数。
图片访问403
img 访问 403 通常是服务器设置了 Referer 防盗链,加入白名单即可
或者
方法一:img 标签 referrer
1 | <img referrer="no-referrer" src=""/> |
方法二:meta 标签 referrer
1 | <meta name="referrer" content="no-referrer" /> |
referrer 的取值可见:https://blog.csdn.net/weixin_42560424/article/details/131419907
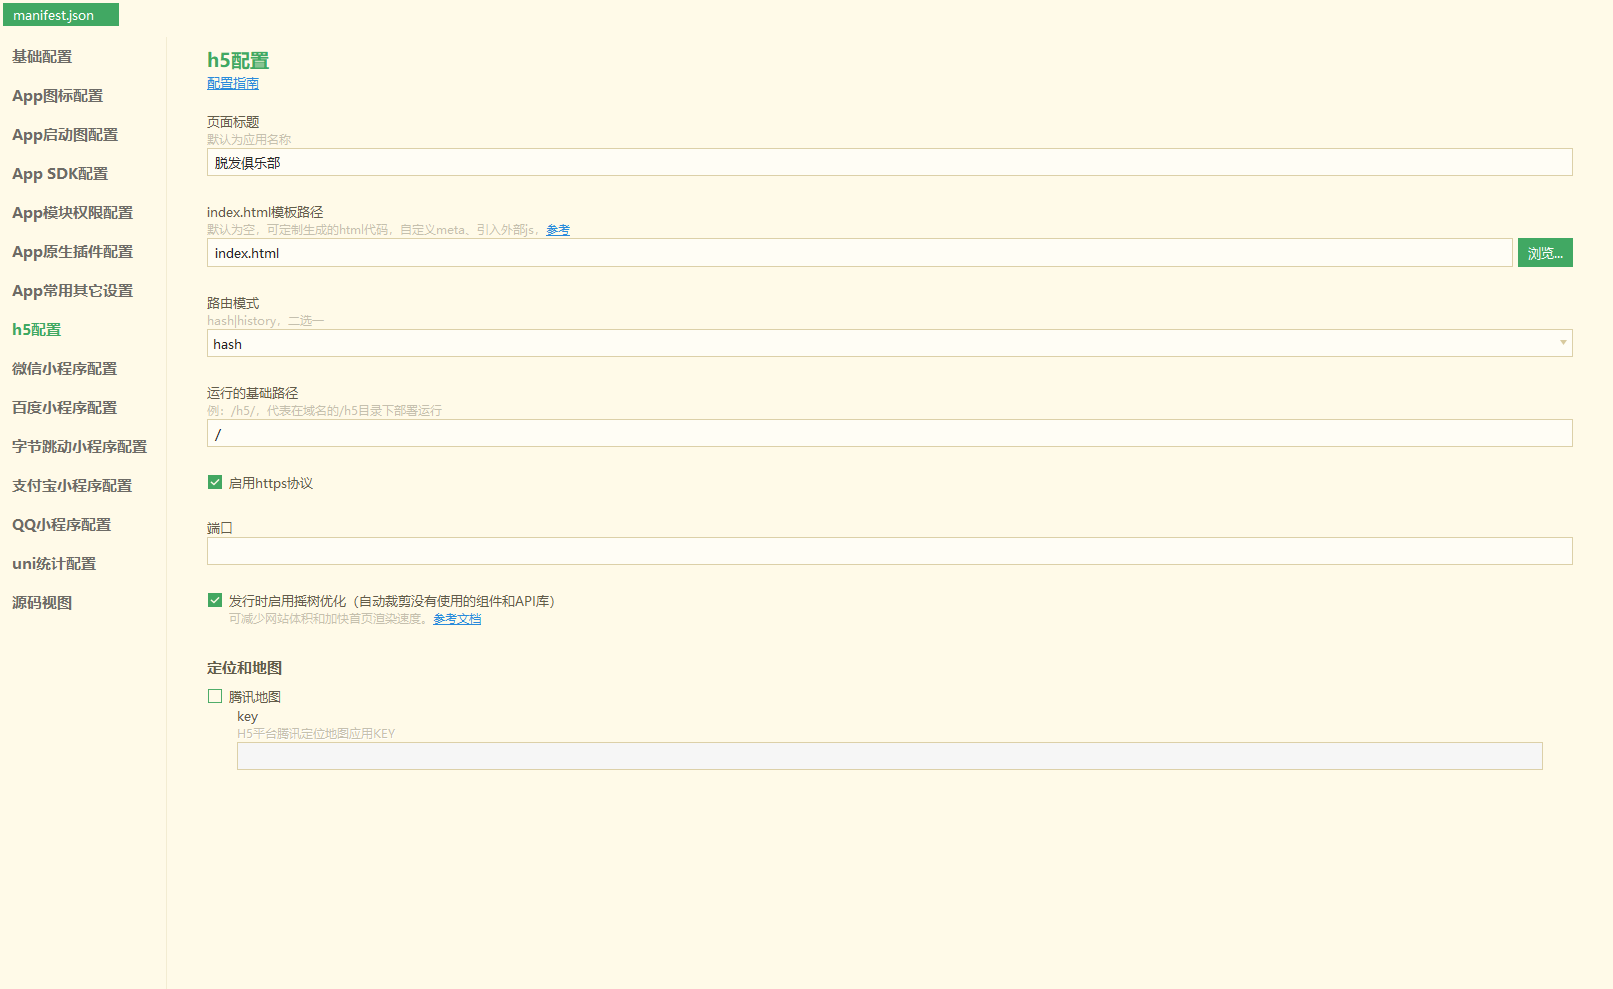
这里采用了方法二,需要自定义uniapp的html模板
- 根目录下创建index.html文件
- manifest文件的html5配置中进行index.html文件引入
文档地址:https://uniapp.dcloud.net.cn/collocation/manifest.html#h5-template
vue3暂不支持
表单验证
使用 uni-forms 完成表单结构和进行表单验证
- 表单结构
1 | <uni-forms class="form" ref="form" :modelValue="formData"> |
创建全局验证规则
1
2
3
4
5
6
7
8
9
10
11
12
13
14
15
16
17
18
19
20
21
22
23
24
25
26
27
28
29
30
31
32
33
34
35
36
37
38
39
40
41
42
43
44
45
46
47
48
49
50
51
52
53
54
55
56
57
58
59
60
61
62
63
64
65
66
67
68// common文件夹下创建userRulesMixin
export default {
install (Vue) { // 使用install的形式进行安装mixin(严格来说应该说是插件更合理)
Vue.mixin({
data () {
return {
userRules: {
loginName: {
rules: [
{ required: true, 'errorMessage': "账户名不能为空" },
{ validateFunction: this.validateLoginName } // 自定义验证规则
]
},
password: {
rules: [
{ required: true, 'errorMessage': "密码不能为空" },
]
},
phone: {
rules: [
{ required: true, 'errorMessage': "电话号码不能为空" },
{ validateFunction: this.validatePhone } // 自定义验证规则
]
},
vCode: {
rules: [
{ required: true, 'errorMessage': "验证码不能为空" },
{ validateFunction: this.validateMobileCode } // 自定义验证规则
]
}
},
}
},
methods: {
validateLoginName (rule, val, data, callback) {
switch (true) {
case val.length < 6:
callback('用户名长度不正确')
break;
default:
return true
}
},
/* 验证手机号码 */
validatePhone (rule, val, data, callback) {
const mobileReg = /^(0|86|17951)?(13[0-9]|15[012356789]|166|17[3678]|18[0-9]|14[57])[0-9]{8}$/
switch (true) {
case !mobileReg.test(val):
callback('手机号码格式不正确')
break;
default:
return true
}
},
// 验证后端返回验证码
validateMobileCode (rule, val, data, callback) {
switch (true) {
case val !== this.returnCode: // returnCode数据需要定义在表单使用的实例上
callback('请输入正确的验证码')
break;
default:
return true
}
}
}
})
}
}main.js中使用mixin文件
1
2import userMixin from './common/rulesMixin.js'
Vue.use(userMixin)组件或页面内直接进行使用
1
2
3
4
5
6onReady () {
this.$refs.form.setRules(this.userRules) // 设置校验规则
// this.$refs.form.clearValidate([]) // 清空校验规则
// const data = await this.$refs.form.submit() // 获取表单数据
// const { phone } = await form.validateField(['phone']); // 单独校验手机号并获取手机号
}
检测用户是否登录
应用中一些收藏、评论、点赞等操作需要登录,这些地方都要一个一个去写 检测太过麻烦,因此提取 checkedIsLogin 方法到全局使用。
该应用采用全局 Mixin 的方式实现,大致可以参考源码(commonMixin.js),这里个人感觉并不是很合适,在 Vuex 的 actions 定义视乎更好,可以按需引用。
这里主要说明下vue2全局定义函数有哪些方式
全局混入 (Mixin)
1
2
3
4
5
6
7
8
9
10
11
12
13
14
15
16
17
18Vue.mixin({
methods: {
checkedIsLogin: function () {
return new Promise(resolve => {
if (this.userInfo) {
resolve()
} else {
uni.navigateTo({
url: '/pages/userInfo/login/login'
})
}
})
}
}
})
// 使用
// await this.checkedIsLogin()缺点:可能与组件实例存在命名冲突
原型挂载(Vue.prototype)
1
2
3Vue.prototype.$checkedIsLogin = function () {
// ...
}缺点:可能与其他第三方插件存在命名冲突
插件
1
2
3
4
5
6
7
8
9
10
11// 定义插件
const MyPlugin = {
install(Vue, options) {
Vue.prototype.$checkedIsLogin = function () {
// ...
}
}
}
// 使用插件
Vue.use(MyPlugin)插件方法其实和上面的2个方法一样
Vuex
1
2
3
4
5
6
7
8
9
10
11
12
13
14
15
16
17
18
19
20import Vue from 'vue'
import VueX from 'vuex'
Vue.use(VueX)
export default new VueX.Store({
state: { userInfo: {} },
mutations: {}
actions: {
checkedIsLogin() {
// ...
}
},
})
// 使用
import { mapActions } from 'vuex'
methods: {
...mapActions(['checkedIsLogin'])
}只适合定义与 store 相关的操作
指令(directive)
对于权限控制的场景
1
2
3
4
5
6
7
8
9
10Vue.directive('permission', {
inserted: function (el, binding, vnode) {
const { value } = binding; // 获取指令的值,即所需的权限
const userRoles = vnode.context.$store.getters.userInfo.roles; // 从Vuex store中获取用户角色
if (value && value instanceof Array && !value.some(role => userRoles.includes(role))) {
el.parentNode && el.parentNode.removeChild(el); // 如果用户没有权限,则移除按钮元素
}
},
});
收藏组件
1 | <template> |
标签的切换
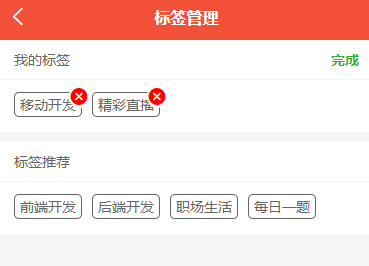
通过 computed 属性只需要控制用户信息中的 label_ids 即可完成标签在我的标签和标签推荐中的切换了
1 | // labelAdmin.vue |
富文本解析
https://ext.dcloud.net.cn/plugin?id=183
rich-text 组件内屏蔽所有节点的事件。所以如果内容中有链接、图片需要点击,则不能使用rich-text
1 | // <u-parse className="markdown-body" :content="content" no-data="数据加载中..."></u-parse> |
文章评论
重点:
- 云函数的处理(get_comments、update_comment)
- 主回复 和 子回复 的区分
- 组件的自我调用(PS:还有一种场景也经常使用嵌套调用就是 文件夹 展示,目前暂不涉及)
update_comment: 更新文章评论云函数
1 | ; |
get_comments: 获取文章评论云函数
1 | ; |
commentBox.vue:文章评论组件嵌套展示(自己调用自己)
子回复才区分 who to who, 所以需要用 isRely 来区分 主回复和子回复
1 | <template> |
关注作者
1 | // 添加计算属性 |
浏览量和点赞数
浏览量
1 | // get_article_detail 的每次请求进行+1操作 |
点赞数
1 | // 添加计算属性 |
收藏文章、作者
处理关注界面数据不刷新问题
1 | // saveLike组件 |
场景复现:当在 首页 给文章添加收藏后切换到 关注页面,关注页面文章列表未同步更新
问题原因:打开过的页面会缓存,再次进入不会触发 onLoad 钩子
解决方法:使用 uni.$on 注册全局监听事件,当点击文章收藏后通过 uni.$emit 触发事件更新
PS: 父子组件可以通过 this.$emit 来触发更新,但是这里是跨页面所以只能采用全局事件
app升级版本
初始化onLoad事件进行版本检测
1
2
3
4
5
6
7
8
9
10
11
12
13
14
15onLoad () {
// !判断是否有新版本进行下载及获取当前的版本
// #ifdef APP-PLUS
uni.getSystemInfo({
success: (res) => {
if (res.platform == "android") {
plus.runtime.getProperty(plus.runtime.appid, wgtinfo => {
this.currentVersion = wgitinfo;
this._checkVersion();
})
}
}
})
// #endif
}进行版本检测,判断当前版本是否小于最新版本
1
2
3
4
5
6
7
8// app中判断是否有新版本(下载链接和云函数中的版本需要在打包apk的时候通过脚本更新,这里暂未涉及,只能手动修改数据库)
async _checkVersion() {
const {version,downLoadLinkUrl} = await this.$http.get_current_version();
if(version > this.currentVersion) {
this.haveNewVersion = true;
this.downLoadLinkUrl = downLoadLinkUrl
}
}下载最新版本内容进行安装处理
1
2
3
4
5
6
7
8
9
10
11
12
13
14
15
16
17
18
19
20
21
22
23
24// 获取最新版本app下载
_getNewVersion() {
uni.showLoading({title:'下载中,请稍后'});
var dtask = plus.downloader.createDownload(this.downLoadLinkUrl, {}, function (d, status) {
// 下载完成
uni.hideLoading({})
if (status == 200) {
plus.runtime.install(plus.io.convertLocalFileSystemURL(d.filename), {}, {}, function (error) {
uni.showToast({
title: '安装失败',
duration: 1500,
icon: 'none'
});
})
} else {
uni.showToast({
title: '更新失败',
duration: 1500,
icon: 'none'
});
}
});
dtask.start();
}
意见反馈
选择图片: chooseImage
1 | // 添加图片上传 |
图片上传和删除:uploadFile deletefile
1 | // 图片上传(获取上传后所有图片的id结果) |
发布打包
H5打包发布
配置:根据自己需要配置 mainfest.json
主要关注下 template(修改默认的title和favicon)和 运行的基础路径(不严格的话推荐用相对路径
./),详见:https://uniapp.dcloud.io/collocation/manifest?id=h5
发行:HbuilderX工具栏 -> 发行 -> 网站-H5手机版(仅适用于 uni-app)
弹窗填入
网站标题和网站域名后点击发行PS:如果没有服务器的话,可勾选弹窗的
前端网页托管(需要开启),详见:https://uniapp.dcloud.io/uniCloud/hosting部署:提交线上服务器
① 有服务器:从
unpackage/dist/build/h5文件夹下获取编译好的文件上传服务器部署② 没有服务器:上一步勾选
前端网页托管后发布会自动上传到托管地址(后续更改点击 发行 -> 上传网站服务器 即可)PS:需要进行安全域名配置,控制台配置位置:https://unicloud.dcloud.net.cn/pages/cross-domain-config/cross-domain-config?pageid=mp-6cd2c609-4996-4633-86b2-d0c50be6d734
PS:线上报错
fc_function_not_found get_label_list的话可以检查下是否有上传部署云函数
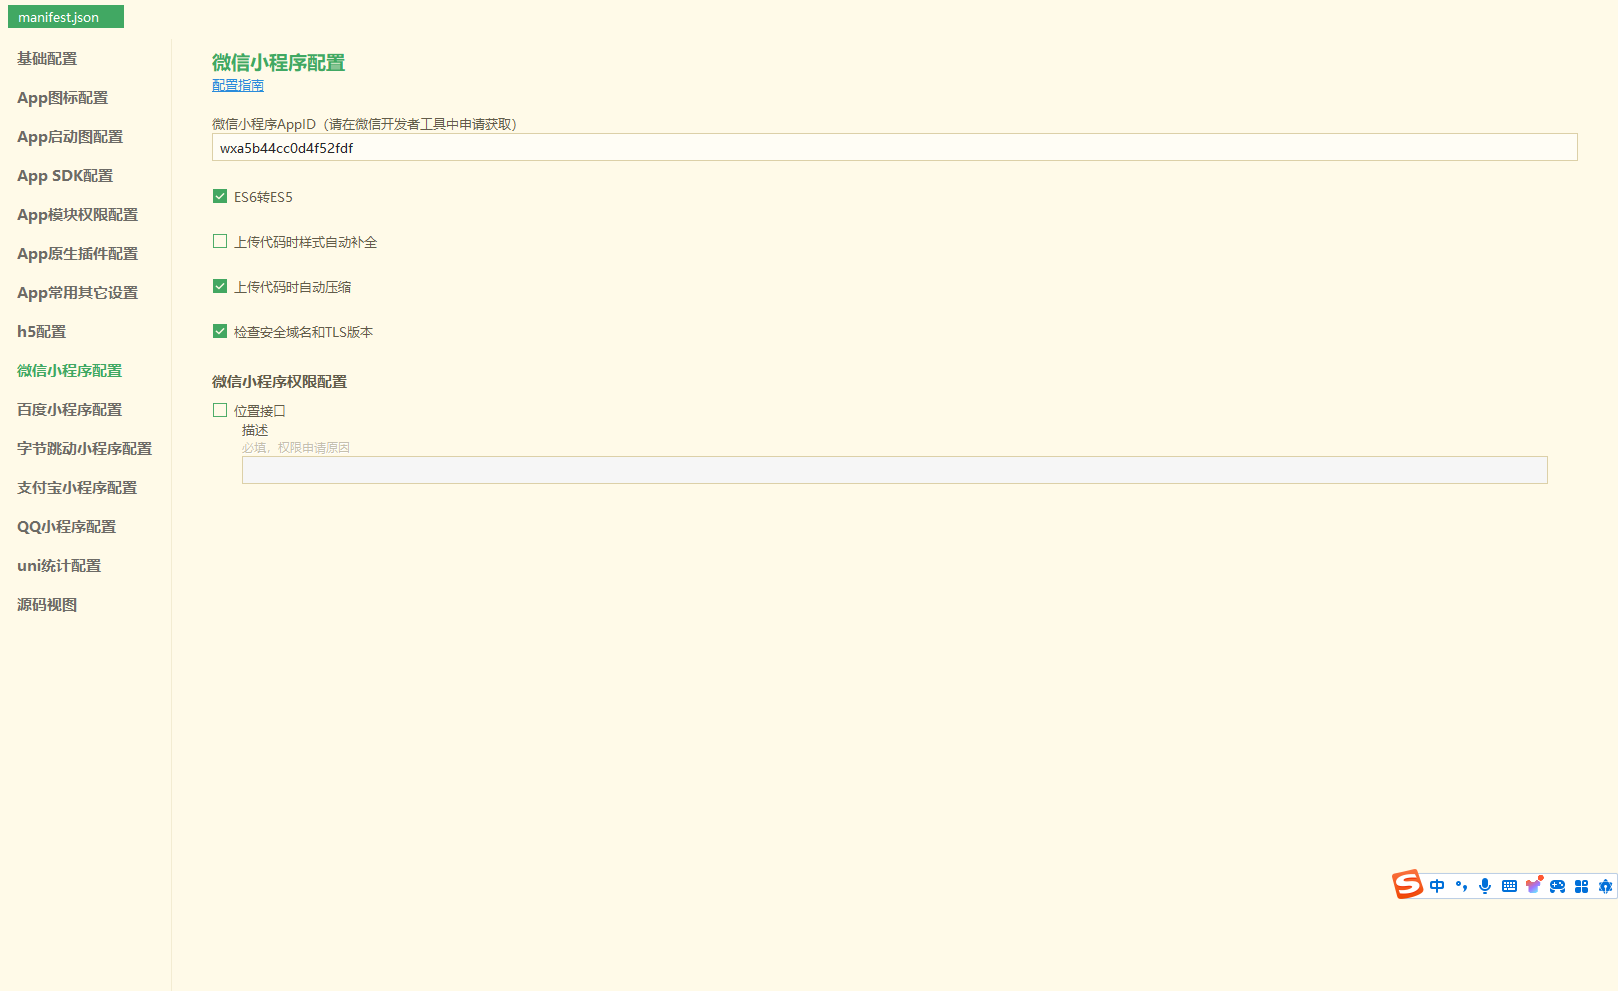
微信小程序打包发布
配置:根据自己需要配置 mainfest.json
appid 是必须要的,详见:https://uniapp.dcloud.net.cn/collocation/manifest.html#mp-weixin
PS:小程序有严格的体积限制,不能超过2M
2.发行:HbuilderX工具栏 -> 发行 -> 小程序-微信(仅适用于 uni-app)
弹窗填入
微信小程序名称和微信小程序AppId后点击发行
部署:提交微信审核
上一步会自动编译后打开
微信开发者工具,通过其进行发布
- 检查项目配置:主要注意下合法域名
- 点击
上传,输入版本号- 登录微信公众平台,在
版本管理里面提交审核
app安卓系统应用打包发布
IOS的打包发布较为麻烦,需要有 MAC电脑 和 开发账号(收费),因此这里不涉及,如有需要可见:https://note.youdao.com/ynoteshare/index.html?id=00a6cb53002d052c21aeddd4d1ded1c8
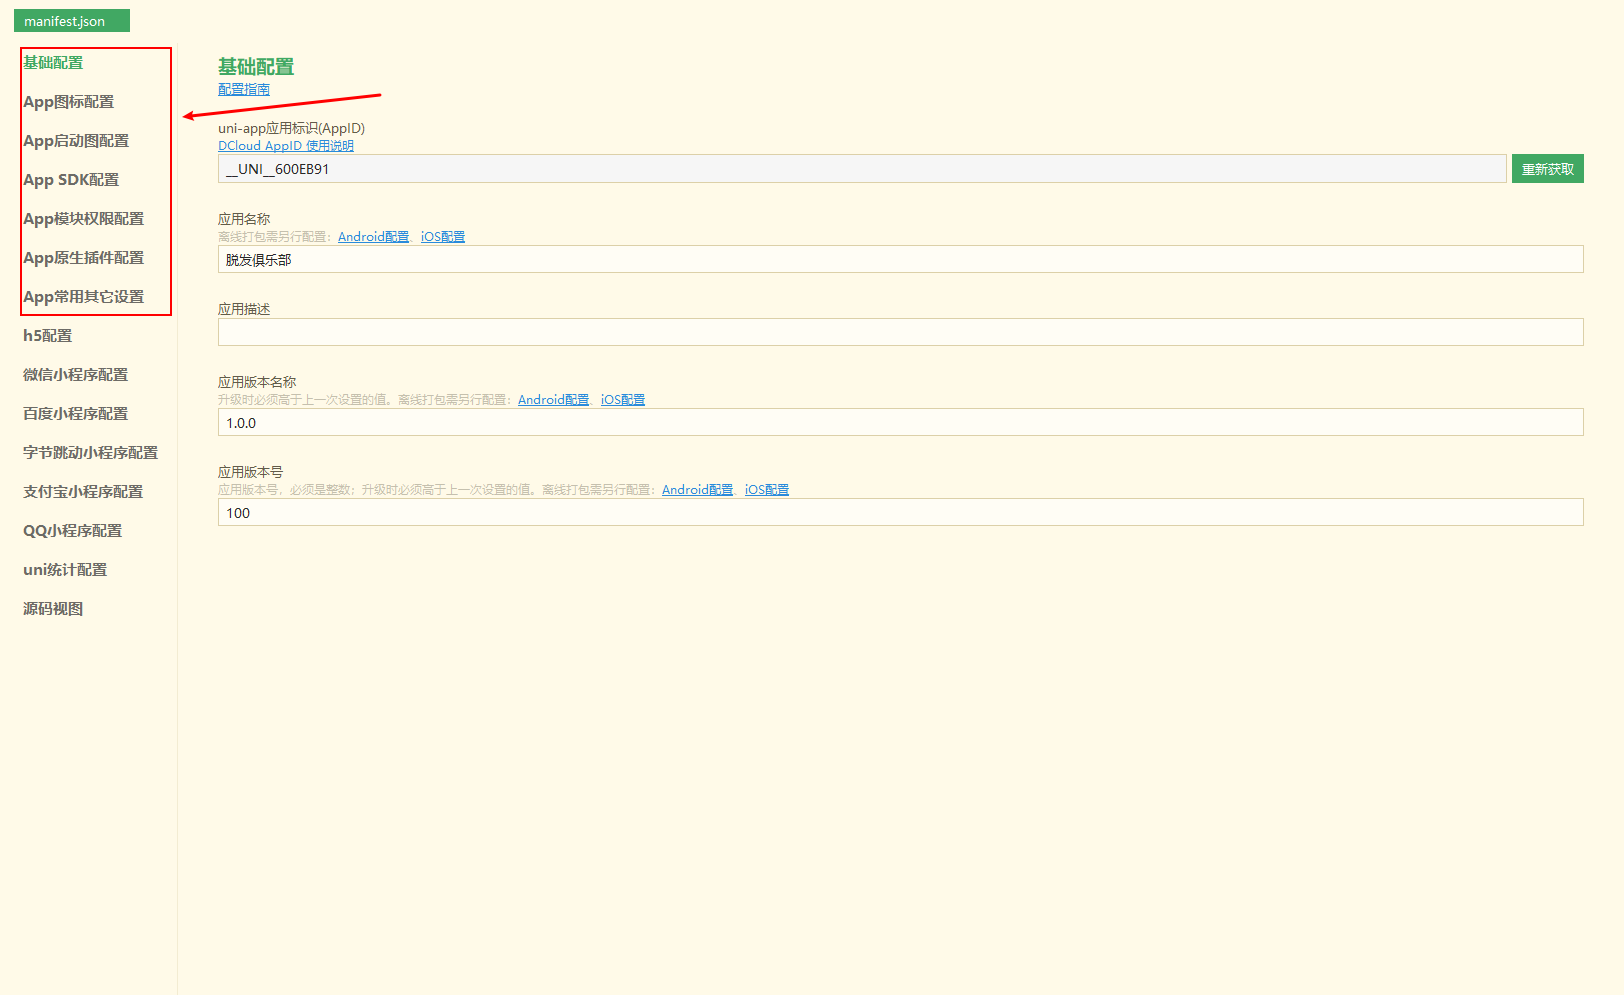
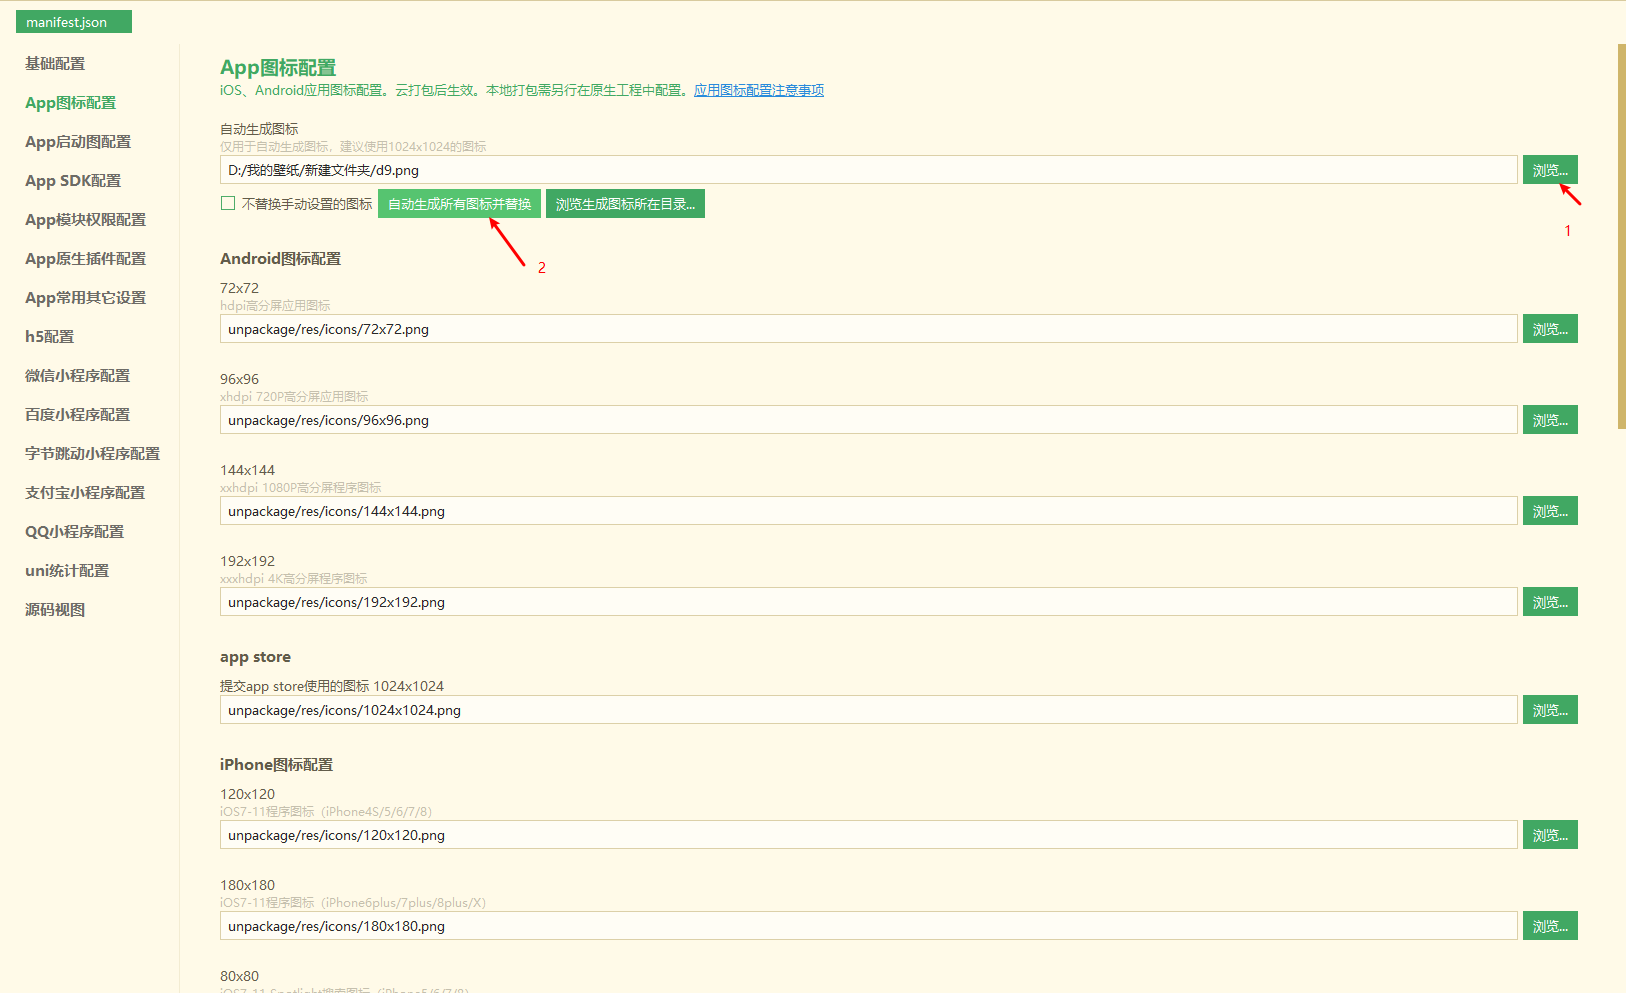
配置:根据自己需要配置 mainfest.json
主要需要配置的是
基础信息和APP图标配置,其他该应用暂不涉及因此无需配置,详见:https://uniapp.dcloud.net.cn/collocation/manifest.html#app-plus
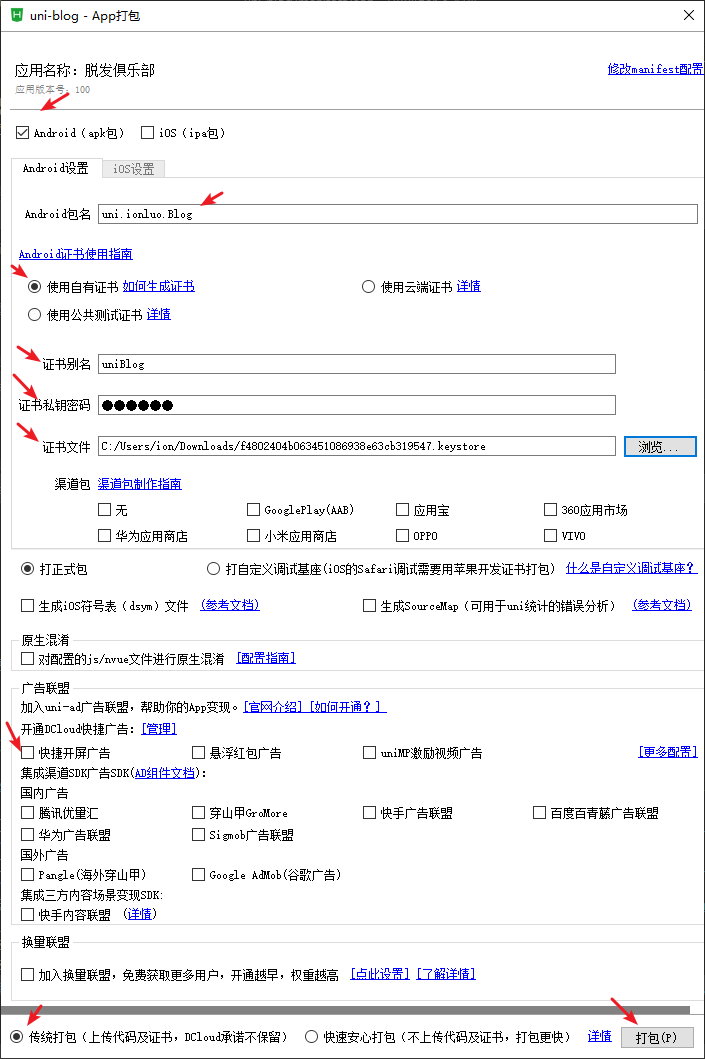
打包:HbuilderX工具栏 -> 发行 -> 原生App-云打包
本地打包需要有原生app开发经验才能胜任,因此这里选择云打包
① 使用
自有证书,证书下载地址:https://www.taomamao.cn/index.php/apkcert PS:上面证书下载地址证书会报错
Caused by: java.security.InvalidKeyException: The security strength of SHA-1 digest algorithm is not sufficient for this key size,因此改成从 https://www.yunedit.com/update/androidzhengshu/list 下载 证书别名必须全部都是英文字符,否则打包报错
Caused by: java.io.IOException: Failed to generate v1 signature② 根据上面生成证书填入的信息填写 证书别名、密码和证书下载后的文件地址,其他根据情况配置
③ 点击
打包,成功后控制台会打印下载地址PS:每次更新打包需要修改
应用版本名称和应用版本号,且必须比原先版本大
使用插件
- uni-load-more:加载更多插件 => https://ext.dcloud.net.cn/plugin?id=29 (监听scroll-view的 scrolltolower 事件,触底时进行新的数据请求,根据最终数据给插件赋予不同状态)
- uni-forms:表单验证插件 => https://ext.dcloud.net.cn/plugin?id=2773
- uParse:富文本解析插件:https://ext.dcloud.net.cn/plugin?id=183
- uni-popup:弹出层插件:https://ext.dcloud.net.cn/plugin?id=329
- uni-dateformat:日期格式化:https://ext.dcloud.net.cn/plugin?id=3279
- uni-simple-router:添加路由守卫:https://hhyang.cn/v2/
项目需要优化点
重要的优化点
首页文章列表数据应该可以用 keepalive 进行下组件缓存,免去每次切换都需要重新渲染DOM。
列表可能会很长,如果全部显示拉到1000条就会出现卡死的问题,应该设定一个滚动的懒加载。(虽然个人感觉实际使用上应该没有人会这样子做,但是实际上还真有人去这样子反馈这类问题) PS:要长列表有最好的性能在APP推荐使用 nvue 实现,如此可以不用懒加载
对于首页列表来说,为了加强用户体验可以增加骨架屏,实现方案:https://blog.csdn.net/qq_38003956/article/details/131652390
登录云函数中password没有加密保存
mutations.js => setHistory 中 搜索历史没有限制长度,会导致无限追加搜索历史(已处理)
很多 vue 组件没有 style 没有限制 scoped,容易样式污染
文章详情页面富文本是否可能存在样式污染,富文本过长优化
全局 Mixins 变量和方法最好添加前缀(如 $userInfo 或者 global_userInfo) 以便与当前实例内容区分
PS:全局混入的都推荐如此处理,比如 Vue.prototype.$http
commentBox.vue 回复子回复的时候应该带上引用的内容,否则如果a对评论进行了3次回复,b对a的其中一条回复进行了回复就完全不知道b回复的是a的哪一条回复
目前分页云函数没有返回total,因为移动端只需要一直加载加载不到了就是结束了,无需知道一共有多少条数据,但是如果有些地方需要分页要获取总数就需要返回了
云函数未做鉴权
关注页面未做分页
$http 没有区分接口失败的情况
关注页面“作者”一栏应该参考文章详情里面的卡片展示好些,也拥有关注和取消关注按钮,这样子就不用到文章详情里面去找关注的作者来取消关注了。
我的页面里面 follow_count(被关注)、fans_count(粉丝)、integral_count(积分)目前都是静态数据,未添加相应的逻辑功能
我的页面里面“我的文章”在未登录状态会显示,但是其实该页面需要登录后才能进入,没有登录直接不显示就好了(“意见反馈”应该要允许匿名反馈,即不需要登录)
用户头像更改的时候会删除对象存储里面的图片和更新文章作者里面的图片地址,但是没有更新文章评论里面用户的头像地址
不太重要的优化点
ListItem.vue 中 loadData 应该放到 articleList 里面去,没有必要搞那么多对象出来。articleList 里面是 get_article_list 返回的全部数据
增加更多的登录方式,短信验证目前都是收费的,不是商业应用还是不要用该方式为好(推荐邮件登录,虽然安全性没有那么好,但是免费)
首页点击搜索输入框跳入搜索页面应该自动聚焦到输入框
目前全局方法和变量是通过Vuex保存的,我想对于一些小型应用可以使用 globalData来保存全局数据(这里没有必要去改,虽然数据不多但是要切换到globalData改动还是挺多的,这里只是提一下对于小型应用不一定都要上vuex,详见:https://ask.dcloud.net.cn/article/35021%EF%BC%89)
评论通知
可增加功能
- 个人文章的发布、编辑
- 详情页面缩放
- 注册和忘记密码,另外可检测微信小程序环境增加一键登录
面试考点提取
全局变量的实现方式
- 全局模块(通过 import 导入使用)
- 挂载 Vue.prototype (挂载vue原型,容易造成原型污染,一般不推荐)
- globalData(小型应用可以考虑)
- Vuex (大型应用优选)
页面跳转传参
使用地址栏传参
1
2
3
4
5
6
7
8
9
10
11
12// 列表页面 (item 是对象类型数据)
uni.navigateTo({
url: `getDetails?id=${id}&item=${encodeURIComponent(JSON.stringify(item))}`
});
// 详情页面
onLoad(option){
console.log('上一个页面传递过来的参数', option)
console.log('id', option.id)
console.log('item', JSON.parse(decodeURIComponent(option.item)))
}使用 eventChannel
(未验证)1
2
3
4
5
6
7
8
9
10
11
12
13
14
15// 列表页面
uni.navigateTo({
url: `getDetails`,
success: (res) => {
res.eventChannel.emit('acceptDataFromOpenerPage', { data: 'data from starter page' })
}
});
// 详情页面
onLoad(option) {
const eventChannel = this.getOpenerEventChannel();
eventChannel.on('acceptDataFromOpenerPage', (data) => {
console.log('上一个页面传递过来的参数', data.data)
})
}使用
uni.$emit()发送事件,uni.$on()监听事件1
2
3
4
5
6
7
8
9
10
11
12
13
14// 列表页面
uni.navigateTo({
url: `getDetails`,
success: (res) => {
uni.$emit('update', {msg: '页面更新'})
}
});
// 详情页面
onLoad(option) {
uni.$on('update', (data) => {
console.log('上一个页面传递过来的参数' + data.msg);
})
}
flex布局使用
https://ruanyifeng.com/blog/2015/07/flex-grammar.html
1 | flex-grow: 1 => 自动放大,默认是0,也就是不放大 |
PC宽屏适配
https://uniapp.dcloud.net.cn/tutorial/adapt.html
响应式布局
rpx 相当于把屏幕宽度分为750份,1份就是1rpx
px 绝对单位,页面按精确像素展示(逻辑像素,理论上与物理像素比较的话也算相对像素,因为受 devicePixelRatio 影响)
em 相对单位,相对于它的父节点字体大小来计算
rem 相对单位,相对根节点html的字体大小来计算
% 一般来说就是相对于父元素
vh 视窗高度,1vh等于视窗高度的1%
vw 视窗宽度,1vw等于视窗宽度的1%
常见功能实现
下拉刷新
1
2
3
4
5
6
7
8
9
10
11
12
13
14
15
16
17
18
19
20// 1.在pages.json文件里找到需要下拉刷新的页面pages节点,并在 style 选项中开启enablePullDownRefresh。
{
"path": "pages/index/index",
"style": {
"navigationBarTitleText": "首页",
"enablePullDownRefresh": true
}
},
// 2.在页面中调用监听下拉事件函数(与生命周期函数同级)
onPullDownRefresh() {
this.doSomething()
}
// 3.获取数据完毕后调用停止下拉刷新动画
doSomething(){
this.$http.get_data().then(res => {
uni.stopPullDownRefresh()
})
}上拉加载
1
2
3
4
5
6// 与生命周期函数同级
onReachBottom () {
if (this.loading === 'noMore') return
this.page++;
this._getCommentList()
}左右滑动页面
1
2
3
4
5
6
7
8
9
10
11
12
13
14
15
16
17
18
19
20
21
22
23<template>
<view class="follow-container">
<view class="follow-tab">
<view class="follow-tab-box">
<view class="follow-tab-item" :class="{active:currentIndex===0}" @click="currentIndex =0">文章</view>
<view class="follow-tab-item" :class="{active:currentIndex===1}" @click="currentIndex =1">作者</view>
</view>
</view>
<!-- 内容切换区域 -->
<view class="follow-list-container">
<swiper class="follow-list-swiper" :current="currentIndex" @change="currentIndex =$event.detail.current">
<swiper-item>
<view v-if="articleDataNone" class="no-data">暂无收藏的文章</view>
<ListItem :isShowLoading="isShowLoading" :articleList="articleList" v-if="articleList.length"></ListItem>
</swiper-item>
<swiper-item>
<view v-if="authorDataNone" class="no-data">暂无关注的作者</view>
<AuthorList :authorList="authorList" v-if="authorList.length"></AuthorList>
</swiper-item>
</swiper>
</view>
</view>
</template>
遇到的问题
微信小程序中 && 运算符前面为false的时候也会执行后面的逻辑
uniapp不支持路由拦截,因此登录检查只能在 onLoad 中进行。最终是通过 uni-simple-router 插件添加的路由守卫实现
使用 uni-simple-router 插件后,有以下几点不便:(好处就是页面跳转更流畅)
uni.navigateTo需要改成this.$Router.push1
2
3
4
5
6
7// 如果不修改,url也必须手动转换为绝对路径且可能存在其他一些奇奇怪怪获取不到参数的问题
// uni.navigateTo({ url: `/pages/articleDetail/articleDetail?params=${JSON.stringify(params)}` })
//todo 使用Router对象方法进行界面跳转
this.$Router.push({
path: '/pages/articleDetail/articleDetail',
query: params
})页面参数获取也要改成从
this.$Router.currentRoute.query.params里面获取,不能从 onLoad 的 options 里面获取1
2
3
4onLoad (options) {
// this.articleData = JSON.parse(options.params)
this.articleData = this.$Router.currentRoute.query
}微信小程序不支持 tabBar 里面的路由拦截,需要针对小程序适配用 onLoad 去拦截跳转
1
2
3
4
5
6
7
8
9
10
11// follow.vue
onLoad() {
// #ifdef MP-WEIXIN
if(!this.$store.state.userInfo) {
uni.redirectTo({
url:'/pages/userInfo/login/login'
})
return
}
// #endif
}
页面缓存导致一些信息更新不同步
目前缓存的情况有:
- 通过 computed 建立和 userInfo 的关系来当收藏之后达到同步更新的目的
1
2
3
4
5
6
7
8
9
10
11
12
13
14
15
16
17
18
19
20
21
22
23computed: {
// 文章的收藏状态
isLike () {
return this.userInfo && this.userInfo.article_likes_ids.includes(this.item._id)
},
// 作者的关注状态
isFollowAuthor () {
return this.userInfo && this.userInfo.author_likes_ids.includes(this.articleData.author.id)
},
// 文章的点赞状态
isCompliments () {
return this.userInfo && this.userInfo.thumbs_up_article_ids.includes(this.articleData._id)
},
// 激活显示的标签
labelList () {
if (this.userInfo) {
this.activeIndex = 0;
return [...this.$store.state.labelList.slice(0,1),...this.$store.state.labelList.filter(item => this.userInfo.label_ids.includes(item._id))]
} else {
return this.$store.state.labelList
}
},
}- 通过 uni.$emit 和 uni.$on 全局通知更新
1
2
3
4
5
6
7
8// saveLike组件
uni.$emit('updateArticle')
// followPage界面
// ps: 没有这个历史记录栈的时候不会触发这个事件
uni.$on('updateArticle',(e)=> {
this._getFollowArticle();
})除了上面的 关注文章,关注作者也用上面的方式处理
微信小程序内,关注作者列表为空的时候页面空白没有显示“暂无收藏的文章”,点击切换的时候才显示
1
2
3
4
5
6
7
8
9
10<swiper class="follow-list-swiper" :current="currentIndex" @change="currentIndex =$event.detail.current">
<swiper-item>
<view v-show="articleDataNone" class="no-data">暂无收藏的文章</view>
<ListItem :isShowLoading="isShowLoading" :articleList="articleList" v-if="articleList.length"></ListItem>
</swiper-item>
<swiper-item>
<AuthorList :authorList="authorList" v-if="authorList.length"></AuthorList>
<view v-if="authorDataNone" class="no-data">暂无关注的作者</view>
</swiper-item>
</swiper>解决方法:不使用 v-show 来控制显示,改成插值表达式显示(具体原因不明,猜测和小程序的渲染机制有关)
1
2
3
4
5
6
7
8
9
10<swiper class="follow-list-swiper" :current="currentIndex" @change="currentIndex =$event.detail.current">
<swiper-item :class="{'no-data':articleDataNone}">
{{articleDataNone && '暂无收藏的文章'}}
<ListItem :isShowLoading="isShowLoading" :articleList="articleList" v-if="articleList.length"></ListItem>
</swiper-item>
<swiper-item>
<AuthorList :authorList="authorList" v-if="authorList.length"></AuthorList>
<view v-if="authorDataNone" class="no-data">暂无关注的作者</view>
</swiper-item>
</swiper>多个 uni.showToast 被顶掉的问题
比如文章收藏后会触发关注文章列表更新,他们都会调用 uni.showToast 进行提示,导致只显示最后一个 uni.showToast
这里由于文章关注列表更新只是后台无感知的,因此直接对于这类请求不进行任何提示
1
2
3
4
5
6
7
8
9
10
11
12
13
14
15
16
17
18
19
20
21
22
23
24
25
26
27
28// http.js
export default ({ name, data = {} }) => {
/* 导出promise对象 */
const loading = data.isLoading
data.isLoading && delete data.isLoading; // isLoading 用于判断是否需要提示
return new Promise((resolve, reject) => {
!loading && uni.showLoading({
title: "加载中"
})
uniCloud.callFunction({
name,
data,
success ({ result }) {
if (result.code === 0) {
resolve(result.data)
} else {
uni.showToast({ icon: "none", title: result.msg })
}
},
fail (err) {
reject(err)
},
complete (res) {
!loading && uni.hideLoading()
}
})
})
}
chooseImage 获取图片接口在小程序和APP里面获取不到文件名
1
2
3
4
5
6
7
8
9
10
11
12
13// 修改用户图片
changeAvatar () {
uni.chooseImage({
count: 1,
success: async res => {
// 兼容小程序和APP里面获取不到文件名
res.tempFiles[0].name = res.tempFiles[0].name ||
Date.now().toString() + res.tempFilePaths[0].substr(res.tempFilePaths[0].lastIndexOf('.'))
const filePath = await this._uploadFile(res.tempFilePaths[0], res.tempFiles[0].name)
await this._updateUserAvatar(filePath)
}
})
},
本文链接: http://www.ionluo.cn/blog/posts/de992313.html
版权声明: 本作品采用 知识共享署名-非商业性使用-相同方式共享 4.0 国际许可协议 进行许可。转载请注明出处!
