搭建网上的教程很多,我这里举例一个:
超详细Hexo+Github Page搭建技术博客教程【持续更新】
我这里使用的是hexo-yilia主题,只写下了搭建好hexo博客和yilia主题后的进阶操作。
2021-4-4 如果时间允许建议自己搭建一个博客站点,hexo有一个很麻烦的缺点就是每次都要编译所有的文件——hexo 每次新增文章都要把之前的全编译一遍吗?
头像和网站logo设置
1、存放位置
头像、图标图片的存放位置是/themes/yilia/source/下任意位置,可以自己新建一个文件夹存放,我存放在assets/img文件夹下。
2、配置设置
配置文件为/themes/yilia/_config.yml。
设置头像为配置文件中avatar一项
设置网站logo为配置文件中favicon一项
由于项目中_config.yml路径的根目录为/blog/(root: /blog/),因此,修改配置为:
1 | # /source/assets/img/favicon.jpg |
设置标题等站点信息
config.yml
1 | # 站点信息设置 |
首页列表展示部分内容
这里我参考了:https://blog.csdn.net/itguangzhi/article/details/79510044
https://blog.csdn.net/weixin_30399797/article/details/99023570
但是第二个好像不行,对第一种的方法做了点调整。
编辑themes\yilia\layout\_partial\article.ejs文件,
1 | <div class="article-entry" itemprop="articleBody"> |
上面配置使得文章有指定description的时候,用description来作为描述。没有的话,用文章内容中的<!-- more -->作为截断。如果也没有<!-- more -->的话,提取html原文截断指定字符来显示(缺点:会显示html标签)。最后才用全文来填充。
我这里使用的是description的方式,通过nodejs的包先解析HTML,分析提取摘要。
置顶文章
安装插件
1
2npm uninstall hexo-generator-index --save
npm install hexo-generator-index-pin-top --save配置文章
然后在需要置顶的文章的Front-matter中加上top选项即可。top后面的数字越大,优先级越高。
1
2
3
4
5---
title: xxxx
date: 2021-03-27 16:10:03
top: 1
---配置优先级
修改根目录配置文件
/_config.yml中的index_generator。 top值-1标示根据top值倒序(正序设置为1即可),同样date也是根据创建日期倒序。1
2
3
4
5
6
7index_generator:
path: ''
per_page: 10
# order_by: -date
order_by:
top: -1
date: -1
注意:如果既要置顶又要隐藏文章,目前通过
hexo-generator-index-custom插件实现。使用该插件需要uninstall会导致冲突的hexo-generator-index-pin-top、hexo-generator-index2,用法即用top字段来控制置顶,用hide字段控制隐藏。
增加不蒜子统计
利用这个统计,可以知道你博客的访问量
在
themes\yilia\layout\ _partial\after-footer.ejs最后添加:1
<script async src="//busuanzi.ibruce.info/busuanzi/2.3/busuanzi.pure.mini.js"></script>
在
themes/yilia/layout/_partial/article.ejs中增加代码1
2
3
4
5
6
7
8
9
10
11
12<%- partial('post/title', {class_name: 'article-title'}) %>
<!-- START 显示阅读次数-->
<% if (!index && post.comments){ %>
<br/>
<a class="cloud-tie-join-count" href="javascript:void(0);" style="color:gray;font-size:14px;">
<!-- <span class="icon-sort"></span> -->
<span id="busuanzi_container_page_pv">
阅读数: <span id="busuanzi_value_page_pv"></span>
</span>
</a>
<% } %>
<!-- END 显示阅读次数-->
增加版权声明
在
themes/yilia/layout/_partial/article.ejs添加版权声明代码1
2
3
4
5
6
7
8
9
10
11
12
13
14
15
16
17
18
19
20
21
22
23
24
25
26
27
28
29
30
31
32<!-- 增加版权声明 -->
<%
var sUrl = url.replace(/index\.html$/, '');
sUrl = /^(http:|https:)\/\//.test(sUrl) ? sUrl : 'https:' + sUrl;
%>
<% if ((theme.declare_type === 2 || (theme.declare_type === 1 && post.declare)) && !index){ %>
<div class="declare">
<strong>本文作者:</strong>
<% if(config.author != undefined){ %>
<%= config.author%>
<% }else{%>
<font color="red">请在博客根目录“_config.yml”中填入正确的“author”</font>
<%}%>
<br>
<strong>本文链接:</strong>
<a rel="license" href="<%=sUrl%>"><%=sUrl%></a>
<br>
<strong>版权声明:</strong>
本作品采用
<a rel="license" href="<%= theme.licensee_url%>"><%= theme.licensee_name%></a>
进行许可。转载请注明出处!
<% if(theme.licensee_img != undefined){ %>
<br>
<a rel="license" href="<%= theme.licensee_url%>"><img alt="知识共享许可协议" style="border-width:0" src="<%= theme.licensee_img%>"/></a>
<% } %>
</div>
<% } else {%>
<div class="declare" hidden="hidden"></div>
<% } %>
<!-- 增加版权声明结束 -->
<% if ((theme.reward_type === 2 || (theme.reward_type === 1 && post.reward)) && !index){ %>增加相关css代码
在
theme/yilia/source/main.0cf68a.css文件下面增加如下css代码即可:1
2
3
4
5
6.declare {
background-color: #eaeaea;
margin-top: 2em;
border-left: 3px solid #ff1700;
padding: 1.5em;
}从该文件可以看出是一个打包后的压缩css文件,那么源文件在哪里呢?下面就说明下源文件的设置编译方法。
我这里安装sass依赖说不支持我的window10 64bit 的系统,估计是node-sass现在已经不推荐的原因之一。不打算深入了解主题源码修改的可以不用看下面了。
增加文件
themes/yilia/source-src/css/declare.scss1
2
3
4
5
6.declare {
background-color: #eaeaea;
margin-top: 2em;
border-left: 3px solid #ff1700;
padding: 1.5em;
}在
themes/yilia/source-src/css/main.scss尾部增加下面代码1
@import "./declare";
接下来,npm install 安装依赖, npm run dist打包即可。
这里说下打包失败怎么还原,其实就是依赖ejs模板引擎,去对照源码,修改layout下的一些地方即可。主要注意全局的
_partial文件夹下的模板。配置主题
themes/yilia/_config.yml1
2
3
4
5
6
7
8
9#版权基础设定:0-关闭声明; 1-文章对应的md文件里有declare: true属性,才有版权声明; 2-所有文章均有版权声明
#当前应用的版权协议地址。
#版权协议的名称
#版权协议的Logo
declare_type: 2
licensee_url: https://creativecommons.org/licenses/by-nc-sa/4.0/
licensee_name: '知识共享署名-非商业性使用-相同方式共享 4.0 国际许可协议'
licensee_img: https://i.creativecommons.org/l/by-nc-sa/4.0/88x31.png如果
declare_type为1,则在需要添加声明的文章头部增加属性declare:true即可。这里我licensee_url和licensee_img都打不开,算了,用来撑撑场子用而已。
私密文章加密
安装插件
1
npm install hexo-blog-encrypt
配置项目
_config.yml,末尾添加1
2
3## 文章加密 hexo-blog-encrypt
encrypt:
enable: true然后在想加密的文章头部添加上对应字段,如:
1
2
3
4
5
6
7
8
9
10
11
12---
title: hello world
date: 2016-03-30 21:18:02
tags:
password: 12345
abstract: Welcome to my blog, enter password to read.
message: Welcome to my blog, enter password to read.
---
# password: 是该博客加密使用的密码
# abstract: 是该博客的摘要,会显示在博客的列表页
# message: 这个是博客查看时,密码输入框上面的描述性文字
首页隐藏文章
安装插件
1
2$ npm install hexo-generator-index2 --save
$ npm uninstall hexo-generator-index --savehexo-generator-index2可以完全替代官方的hexo-generator-index,所以安装之后,先卸载官方的插件,不然会引起一些冲突。
配置项目
_config.yml,index_generator下面添加1
2
3
4
5
6# index2 generator是否包含官方的hexo-generator-index,默认true(包含)
index2_include_index: true
# 配置index2 generator,可以是数组或对象
index2_generator:
exclude:
- tag hide # 隐藏标签是hide的文章然后在想隐藏的文章头部添加上标签hide,如:
1
2
3
4
5
6---
title: hello world
date: 2016-03-30 21:18:02
tags:
- hide
---
注意1:这里只能达到在首页列表隐藏的功能,搜索或者其他地方还是可以找到的,如果需要更完美的方式可以参照https://vanchchen.github.io/p/7587.html试试!
注意2:如果既要置顶又要隐藏文章,目前通过
hexo-generator-index-custom插件实现。使用该插件需要uninstall会导致冲突的hexo-generator-index-pin-top、hexo-generator-index2,用法即用top字段来控制置顶,用hide字段控制隐藏。
404 页面
这里配置的是腾讯公益404页面
在博客根目录 /source 文件夹下创建404.html
1 | --- |
重点:
- 在本地无法打开的页面链接不显示404页面,但是部署到github上是可以的。本地需要预览可以打开
config.url+ 404.html查看。- 有些地方这里是用的
http://www.qq.com/404/search_children.js文件,但是这个不支持https。
增加阅读更多效果
Hexo 整合 OpenWrite 平台的 readmore 插件,实现博客的每一篇文章自动增加阅读更多效果,关注公众号后方可解锁全站文章,从而实现博客流量导流到微信公众号粉丝目的.
这里我没有公众号,就不配置了。详细请看插件介绍:hexo-plugin-readmore
添加看板娘
安装插件
1
npm install hexo-helper-live2d --save
安装模型包
作者提供了三个下载模型的办法,我选择操作比较简单的一种
npm 模块名的方法作者提供以下模型的模型包,模型包预览地址见下面的链接,选择你想用的模型,记住名字,选择对应的后缀模型包
上面链接已失效,可以到这个地方查看:https://github.com/xiazeyu/live2d-widget-models
1
2
3
4
5
6
7
8
9
10
11
12
13
14
15
16
17
18
19
20
21
22live2d-widget-model-chitose
live2d-widget-model-epsilon2_1
live2d-widget-model-gf
live2d-widget-model-haru/01 (use npm install --save live2d-widget-model-haru)
live2d-widget-model-haru/02 (use npm install --save live2d-widget-model-haru)
live2d-widget-model-haruto
live2d-widget-model-hibiki
live2d-widget-model-hijiki
live2d-widget-model-izumi
live2d-widget-model-koharu
live2d-widget-model-miku
live2d-widget-model-ni-j
live2d-widget-model-nico
live2d-widget-model-nietzsche
live2d-widget-model-nipsilon
live2d-widget-model-nito
live2d-widget-model-shizuku
live2d-widget-model-tororo
live2d-widget-model-tsumiki
live2d-widget-model-unitychan
live2d-widget-model-wanko
live2d-widget-model-z16
选择好对应的模型,使用 npm install 模型的包名来安装,比如我选择的的是live2d-widget-model-koharu 模型包
配置
_config.yml1
2
3
4
5
6
7
8
9
10
11
12
13
14
15
16
17
18
19
live2d:
enable: true
scriptFrom: local
pluginRootPath: live2dw/
pluginJsPath: lib/
pluginModelPath: assets/
tagMode: false
log: false
model:
use: live2d-widget-model-koharu
display:
position: right
width: 120
height: 230
hOffset: -10
vOffset: -10
mobile:
show: false
添加评论
首先,您需要选择一个公共github存储库(已存在或创建一个新的github存储库)用于存储评论。(我的是blog-talk)
然后需要创建 GitHub Application,如果没有 点击这里申请。
1 | Application name: # 应用名称 |
我的Github Application: https://github.com/settings/applications/1513824

创建gitalk.ejs
在你的hexo目录
/theme/yilia/layout/_partial/post/目录下创建gitalk.ejs并写入如下内容:1
2
3
4
5
6
7
8
9
10
11
12
13
14
15
16
17
18
19
20<div id="gitalk-container"></div>
<link rel="stylesheet" href="https://cdn.jsdelivr.net/npm/gitalk@1/dist/gitalk.css">
<script src="https://cdn.jsdelivr.net/npm/gitalk@1/dist/gitalk.min.js"></script>
<script src="https://cdn.bootcss.com/blueimp-md5/2.10.0/js/md5.js"></script>
<script>
var gitalk = new Gitalk({
clientID: '<%=theme.gitalk.clientID%>',
clientSecret: '<%=theme.gitalk.clientSecret%>',
repo: '<%=theme.gitalk.repo%>',
owner: '<%=theme.gitalk.owner%>',
admin: ['<%=theme.gitalk.admin%>'],
id: md5(window.location.pathname),
distractionFreeMode: '<%= theme.gitalk.distractionFreeMode %>'
})
gitalk.render('gitalk-container')
</script>修改article.ejs
在你的hexo目录
/theme/yilia/layout/_partial/article.ejs文件中最后一行“<% } %>”之前添加如下内容:1
2
3
4
5
6
7
8
9<!-- begin gittalk -->
<% if(theme.gitalk.enable && theme.gitalk.distractionFreeMode){ %>
<%- partial('post/gitalk', {
key: post.slug,
title: post.title,
url: config.url+url_for(post.path)
}) %>
<% } %>
<!-- end gittalk -->修改
themes\yilia\source\main.0cf68a.css, 默认添加样式1
2
3
4
5
6
7
8
9
10
11
12#gitalk-container {
margin: 0 30px;
position: relative;
border: 1px solid #ddd;
border-top: 1px solid #fff;
border-bottom: 1px solid #fff;
background: #fff;
transition: all .2s ease-in;
padding-right: 7.6923%;
padding-left: 7.6923%;
padding-bottom: 36px;
}添加配置文件
在yilia的配置文件
_config.yml中gitment配置下面添加如下配置文件1
2
3
4
5
6
7
8gitalk:
enable: true #用来做启用判断可以不用
clientID: '7433477a1a82130981e9' #Github上生成的
clientSecret: 'xxxxxxxxxxxxxxxx' #同上
repo: blog-talk #评论所在的github project
owner: Cheerfulion #github用户名
admin: Cheerfulion #可以初始化评论issue的github账户名称
distractionFreeMode: true
重启,大功告成

问题记录:
Error: Validation Failed.当页面 链接过长 或 存在中文链接,导致整个链接字符串长度超过50时,会造成请求issues接口失败,出现422状态码。(中文链接会自动转码,变得很长,id参数默认取的是链接,长度不能超过50)
解决办法:手动/自动设置id取值,限制长度不超过50。(这里我是通过下面的
URL持久化实现的)未找到相关的 Issues 进行评论
每个文章的issues其实是要自己去点击
使用Github登录才会自动初始化点击
使用Github登录后调到首页或者刷新当前页面这个主要就是配置的问题了,首先检查下Github Application的域名配置是否正确。
其次,检查配置文件
config.yml中的repo,owner,admin是否正确,注意大多数情况应该保持admin和owner一致,为你的github账号。gittalk是根据文章的地址进行issue设置并匹配的,所以文章地址不要轻易变更。
侧边栏添加音乐
感觉意义不大,现代浏览器基本都会禁止带声音的自动播放,无法作为背景音乐。
1、网易云音乐外链播放器生成
登录网页版网易云音乐,打开一首歌,点击 “生成外链播放器”。
2、侧栏添加背景音乐
打开/hexo/themes/yilia/layout/_partial/left-col.ejs文件,把音乐HTML代码粘贴进去,可以添加样式,改变大小,这是我的代码:
1 | <nav class="header-nav"> |
添加sitemap
1 | npm install hexo-generator-sitemap --save |
查看public文件夹,可以看到sitemap.xml文件。
sitemap的初衷是给搜索引擎看的,为了提高搜索引擎对自己站点的收录效果,我们最好手动到Google和百度等搜索引擎提交sitemap.xml。
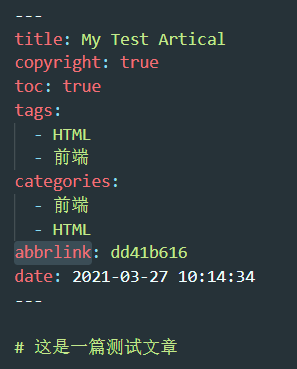
Url持久化(重要)
我们可以发现hexo默认生成的文章地址路径是 【网站名称/年/月/日/文章名称】。
这种链接对搜索爬虫是很不友好的,它的url结构超过了三层,太深了。
下面我推荐安装hexo-abbrlink插件:
1 | npm install hexo-abbrlink --save |
然后修改的_config.yml, 替换掉原来的permalink
1 | # permalink: :year/:month/:day/:title/ |
hexo三连(hexo clean, hexo g, hexo s)之后, 原来长的url就不能访问了,而是类似uuid的形式。其实观察source/_posts/里面的文件就会发现,给文章加上了abbrlink而已。
鼠标点击小红心的效果
在hexo/themes/yilia/layout/_partial/footer.ejs文件的最后, 添加以下代码:
1 | <!-- START 页面点击小红心--> |
添加 RSS
RSS(简易信息聚合)是一种消息来源格式规范,用以聚合经常发布更新数据的网站,例如博客文章、新闻、音频或视频的网摘。RSS 文件(或称做摘要、网络摘要、或频更新,提供到频道)包含全文或是节录的文字,再加上发布者所订阅之网摘数据和授权的元数据。 ———— 维基百科
关于 RSS 的作用参见:如何使用 RSS
在 Hexo 根目录打开命令行工具,执行以下命令:
1
2
3npm install hexo-generator-feed --sava
hexo clean
hexo g查看
public文件夹,可以看到 atom.xml 文件。打开主题配置文件
/themes/yilia/config.yml,在subnav项目下添加 RSS 配置信息:1
2
3# SubNav
subnav:
rss: "/atom.xml"重新生成并构建页面,就可以看到 RSS 的信息了。
参考文章
本文链接: http://www.ionluo.cn/blog/posts/fb846fae.html
版权声明: 本作品采用 知识共享署名-非商业性使用-相同方式共享 4.0 国际许可协议 进行许可。转载请注明出处!
